Time of Day Dependent Buffs
| Author: Prancer (sc2mapster.com) | Tags: intermediate data trigger behavior | |
| Source: http://forums.sc2mapster.com/resour... | Added 15 years ago |
Hello. I have recently been playing around with the SC2 editor and figured out how to make buffs which are only active during certain times of the "day" and I decided I should write a tutorial on it.
In this tutorial we'll create a new unit called the "Night Templar" which cloaks only during the night. We'll go over creating Validators, Behaviors and new Units.
The Validators
We'll begin by creating the necessary validators. Validators allow behaviors to check for certain conditions before affecting a unit. In this way we will disable or enable cloaking based on the "Time of Day" in the game.
Fire up the SC2 editor and open the Data Editor. Change the Data Type to Validators and then Add a New Object. Name this object IsBeforeSunrise, click Suggest and change the Validator Type to Time of Day. Click OK.
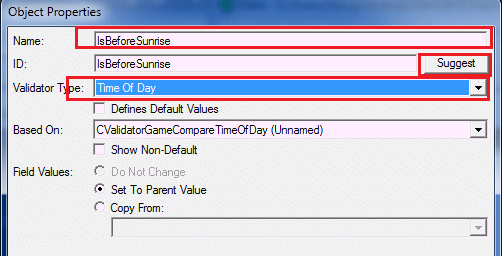
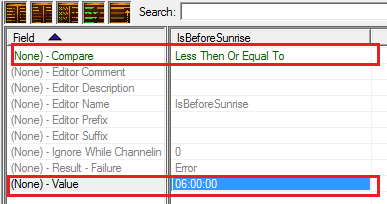
With this newly created validator selected, change the field (None) - Compare to "Less Then Or Equal To" (Note the spelling error, should be 'than' just for your information). Now set the field (None) Value to 06:00:00. You can set this value to any time you'd like to have as the sunrise. I'm going to make night be from 6 PM to 6AM in this tutorial.
Now Add another new Validator. Set the name to IsAfterSunset, click Suggest and change the Validator Type to Time of Day and click OK.
With this validator selected, change the field (None) - Compare to "Greater Than or Equal To" and change the field (None) - Value to 18:00:00. Again, you may set this to whatever time you'd like to have the sunset.
So what we've done is created two new validators that will help us determine whether or not it is day or night. The Compare field describes the type of test we will be performing. What these validators will do is take the current game's Time of Day and compare it with the value we specified. So, if it is 01:00:00 then it will be IsBeforeSunrise but it will not be IsAfterSunset. Now, we know it is night if either one of these validators are true. So, we'll make another validator to "Combine" these two together.
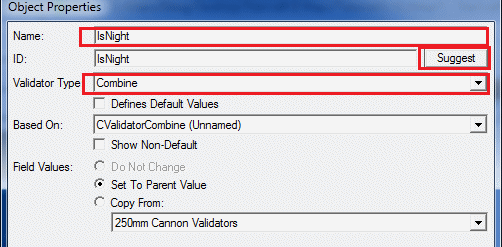
Add another new Validator. Set the name to IsNight, click Suggest and set the Validator Type to Combine. Click OK.
With this new validator selected, Click on the (None) - Combines field. A menu should pop up, Click the Green plus button to add a validator to the list. Select IsAfterSunset and click OK. Now, Click the Green Plus Button again and Select IsBeforeSunrise and Click OK. You should now have both Time of Day validators in your list. Click OK to close the menu.
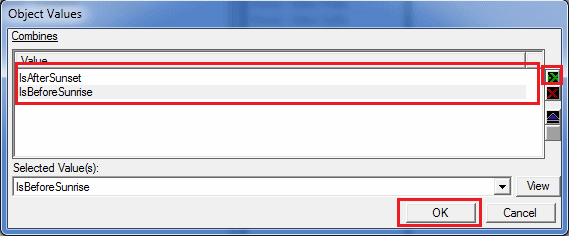
Your IsNight validator is now complete. Notice that, by default, the editor sets the field (None) - Type to "Or". This is a logical OR operator meaning if any of the validators in the (None) - Combines field are true, then this validator is also true. So, if it is after sunset OR before sunrise then we know it is night. If you want a validator for daytime, use the (None) Negate field and enable it to "flip" the value of the combination. If we were to enable the Negate field then this validator would be true if it is NOT after Sunset or before Sunrise, giving us Daytime.
The Buff
Ok, so we now have a way to test if it is nighttime, but how do we use this for our soon-to-be buff? First, it's time we create our buff.
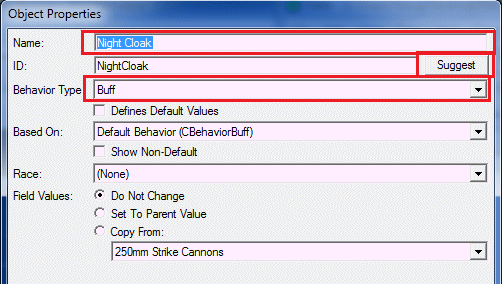
In the Data Editor, set the Data Type to Behaviors. Behaviors are elements which can modify units on the fly. Buffs fall under the heading of Behaviors. Add a new Object and set the name to Night Cloak, click Suggest. Change the Behavior Type to Buff, click OK
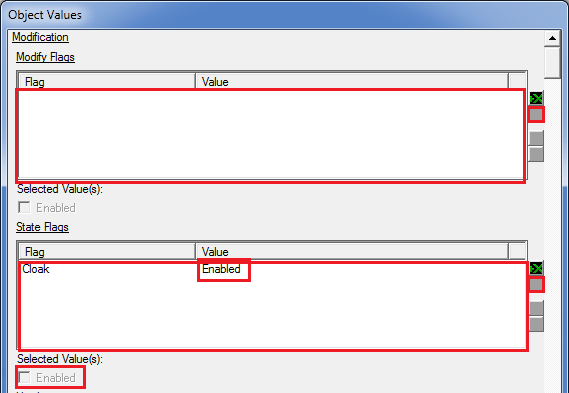
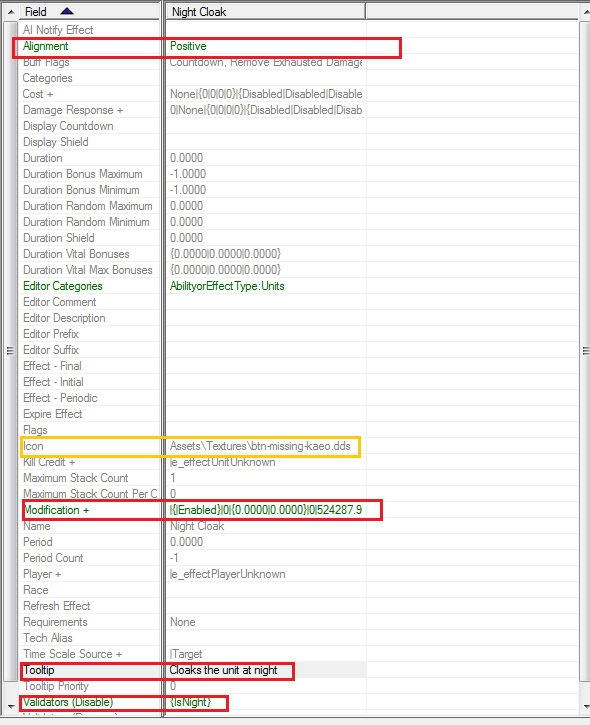
With "Night Cloak" selected, we'll need to set some of its fields. First, change the Alignment to Positive meaning this behavior benefits the unit. If you wish, you may change the Icon field to some icon that you'd like to represent this buff. This Icon is the small one that will show on the unit's information panel at the bottom of the screen Now, the important field we need to look at for this, and basically all buffs is the "Modification +" field. This field allows us to actually set the way this buff will affect a unit. Double Click Modification + to bring up a new menu. At the top of the new menu, under the "Modify Flags" heading Click the little red X to delete ALL entries in this list. We do this to ensure this buff will not override the effects of another buff by messing with these flags. Then, under the State Flags list remove all BUT the CLOAK entry by clicking the little red X. Again, we don't want to affect any state besides the cloak state of the unit. Highlight the Cloak entry in the list and Check the box marked "Enabled" just below. Click OK.
As you can see, the Modification + panel is where all of the dirty work for Buffs is handled. If you explored more, you noticed plenty of other options of things to affect such as move speed, damage, health etc. Many possibilities for Buffs. But for now, our simple buff will make the unit Cloaked.
So, at the moment, our Night Cloak buff will ALWAYS cloak an object no matter what the time is. To fix this, we'll utilize our IsNight validator. If you look near the bottom of the Night Cloak fields you'll see a field called "Validators (Disable)". Click the Validators (Disable) field to open up a list. Click the little green X and add the IsNight Validator. Click OK.
This makes our buff disable anytime the IsNight validator fails. So, if it's daytime, the buff will be disabled. Notice there is also a Validator (Remove) field. This does just as you'd expect and removes the buff from the unit if the validator fails.
Finally, to make our buff more user friendly Change the Tooltip Field and set enter a message that will appear as the tooltip when the player hovers his mouse over the buff icon. I wrote "Cloaks the unit at night". The final fields of the Buff should be like the following:
The Unit
So we have our Buff ready to go and it uses our new IsNight validator. It's time now to create a unit that has Night Cloak as a buff.
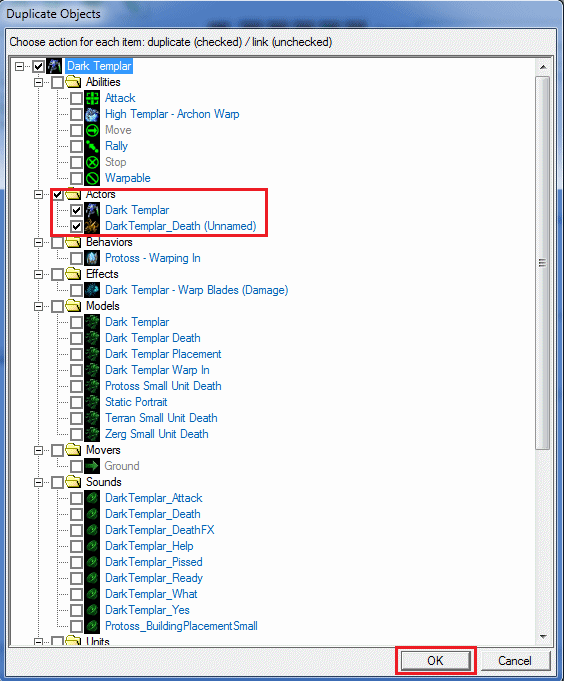
In the Data Editor, Change the Data Type to Units. Find the Dark Templar Unit. Right click it and Duplicate the Dark Templar. In the tree that pops up, all we need to copy are the Actors. So, Check the Actors Folder to select everything inside of it. Click OK. Note we are not copying everything else because we are not modifying anything besides some unit flags. We have to copy the actor because we need an Actor object to reference this unit so that it will be attached to a visual representation of the Dark Templar. Actor can only be associated with a single Unit.
First things first, we certainly don't want this unit to be called "Dark Templar Copy". So Right Click the Dark Templar Copy on the left panel and click "Modify Object...". Change the name to "Night Templar" then click Suggest and Click OK.
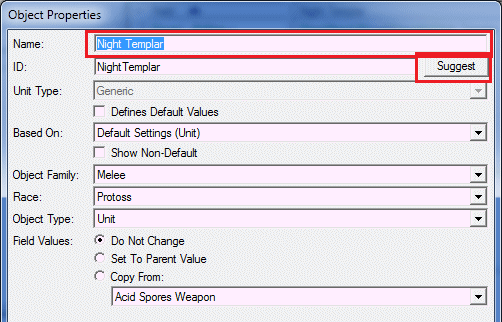
With Night Templar selected, we need to set some important fields. First, since the Night Templar has the same settings as the Dark Templar at the moment, it will be cloaked all the time automatically. To disable this we need to disable the Cloaked flag. Double click the Stats - Flags field and uncheck the Cloaked box. Now the unit will not be cloaked all the time.
It's now time to add our Night Cloak buff to the Night Templar. Click the (None) Behaviors + field. A window should pop up, Click the green X and add the Night Cloak behavior After it is added Click OK.
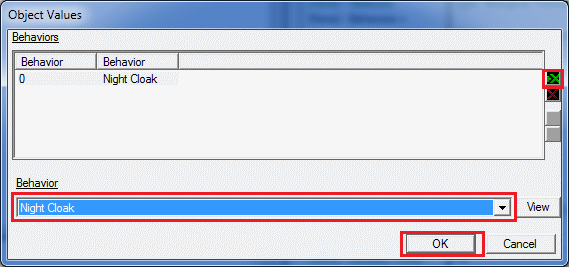
Now our unit has the Night Cloak buff! The buff will handle enabling or disabling the Night Templar's cloaking based on the Time of Day.
Speeding Up the Time of Day
With our Night Templar created, we probably would like to see our new Night Cloak buff in action. To do this, we need to setup a trigger to speed up the time of day progression a bit so that we can see the Cloaking enable and disable based on the time.
Open the Trigger Editor and select the Map Initialization trigger. Delete all of the actions for the trigger. Now, with the Map Initialization trigger still selected Click the Add Action button and a new menu should pop up. With the "Environment" heading selected on the left select "Set Day Length" and click OK. We've now added an action that will set the length of the game day.
With the Set Day Length action selected, click the linked 300.0 and change it to 30.0. This will make a "day" 30 seconds long.
Use the editor to place a Night Templar on the map for Player 1, and test out the map. You should see the unit cloak and decloak as time goes on!
Adding a Clock (Optional)
Having this functionality of time based buffs is pretty neat, but it invites the question, how do we tell the player what time it is in the game? Luckily this isn't too difficult to setup using some trigger play. This part of the tutorial assumes you have used triggers before and are comfortable moving around the editor.
Building the Dialog
Our clock will use SC2's Dialog system to show a little UI clock at the top of the screen. Add a new global variable of type Dialog Item name ClockDisplay. Leave the default value as it is.
One issue we need to address is conversion of the Time of Day variable type to a string for displaying purposes. Create a new Function called "TimeOfDayToString and set it as follows:
Convert Time Of Day To String
Options: Function
Return Type: String
Parameters
Time Of Day = 00:00:00 <Time Of Day>
Grammar Text: convert Time Of Day to string
Hint Text: Converts a time of day value to a string.
Custom Script Code
Local Variables
Actions
General - Return lp_timeOfDay
Thanks to Nevir for this function
Now, select the Map Initialization trigger and add a Create Dialog action. Change it to "relative to Top of screen" and leave the other settings. Add a Show/Hide Dialog action. Change the action to Show instead of Hide. Add a Create Dialog Item (Label) action. Change the Text parameter to take a conversion from String to Text, and then change the string to be TimeOfDayToString function we added, and then pass in the function Get Current Time of Day function to that. The resulting action should be as follows:
Dialog - Create a Label for Dialog (Last created dialog) with the dimensions (200, 50) anchored to Center with an offset of (50, 50) with the text (Text((TimeOfDayToString((Current game time of day))))) color set to White text writeout set to false with a writeout duration of 2.0
Add a Set Variable action and change the variable to ClockDisplay and the value to Last Created Dialog Item. We now have a reference to this label.
Add a Show/Hide Dialog Item action and set it to Show.
Add a new Trigger and add an event Timer -> Periodic Event and set the period to 1.0 second. In the actions for this trigger add a Set Dialog Item Text action. Change the first parameter to ClockDisplay and change the Text parameter to the string-to-text, TimeOfDayToString, Current Time of Day setup that we used in the Label creation action. Now the label will be updated every second with the new time.
You should now have an ingame clock that the player can use to figure out when buffs will be activated.
In this tutorial we'll create a new unit called the "Night Templar" which cloaks only during the night. We'll go over creating Validators, Behaviors and new Units.
The Validators
We'll begin by creating the necessary validators. Validators allow behaviors to check for certain conditions before affecting a unit. In this way we will disable or enable cloaking based on the "Time of Day" in the game.
Fire up the SC2 editor and open the Data Editor. Change the Data Type to Validators and then Add a New Object. Name this object IsBeforeSunrise, click Suggest and change the Validator Type to Time of Day. Click OK.
With this newly created validator selected, change the field (None) - Compare to "Less Then Or Equal To" (Note the spelling error, should be 'than' just for your information). Now set the field (None) Value to 06:00:00. You can set this value to any time you'd like to have as the sunrise. I'm going to make night be from 6 PM to 6AM in this tutorial.
Now Add another new Validator. Set the name to IsAfterSunset, click Suggest and change the Validator Type to Time of Day and click OK.
With this validator selected, change the field (None) - Compare to "Greater Than or Equal To" and change the field (None) - Value to 18:00:00. Again, you may set this to whatever time you'd like to have the sunset.
So what we've done is created two new validators that will help us determine whether or not it is day or night. The Compare field describes the type of test we will be performing. What these validators will do is take the current game's Time of Day and compare it with the value we specified. So, if it is 01:00:00 then it will be IsBeforeSunrise but it will not be IsAfterSunset. Now, we know it is night if either one of these validators are true. So, we'll make another validator to "Combine" these two together.
Add another new Validator. Set the name to IsNight, click Suggest and set the Validator Type to Combine. Click OK.
With this new validator selected, Click on the (None) - Combines field. A menu should pop up, Click the Green plus button to add a validator to the list. Select IsAfterSunset and click OK. Now, Click the Green Plus Button again and Select IsBeforeSunrise and Click OK. You should now have both Time of Day validators in your list. Click OK to close the menu.
Your IsNight validator is now complete. Notice that, by default, the editor sets the field (None) - Type to "Or". This is a logical OR operator meaning if any of the validators in the (None) - Combines field are true, then this validator is also true. So, if it is after sunset OR before sunrise then we know it is night. If you want a validator for daytime, use the (None) Negate field and enable it to "flip" the value of the combination. If we were to enable the Negate field then this validator would be true if it is NOT after Sunset or before Sunrise, giving us Daytime.
The Buff
Ok, so we now have a way to test if it is nighttime, but how do we use this for our soon-to-be buff? First, it's time we create our buff.
In the Data Editor, set the Data Type to Behaviors. Behaviors are elements which can modify units on the fly. Buffs fall under the heading of Behaviors. Add a new Object and set the name to Night Cloak, click Suggest. Change the Behavior Type to Buff, click OK
With "Night Cloak" selected, we'll need to set some of its fields. First, change the Alignment to Positive meaning this behavior benefits the unit. If you wish, you may change the Icon field to some icon that you'd like to represent this buff. This Icon is the small one that will show on the unit's information panel at the bottom of the screen Now, the important field we need to look at for this, and basically all buffs is the "Modification +" field. This field allows us to actually set the way this buff will affect a unit. Double Click Modification + to bring up a new menu. At the top of the new menu, under the "Modify Flags" heading Click the little red X to delete ALL entries in this list. We do this to ensure this buff will not override the effects of another buff by messing with these flags. Then, under the State Flags list remove all BUT the CLOAK entry by clicking the little red X. Again, we don't want to affect any state besides the cloak state of the unit. Highlight the Cloak entry in the list and Check the box marked "Enabled" just below. Click OK.
As you can see, the Modification + panel is where all of the dirty work for Buffs is handled. If you explored more, you noticed plenty of other options of things to affect such as move speed, damage, health etc. Many possibilities for Buffs. But for now, our simple buff will make the unit Cloaked.
So, at the moment, our Night Cloak buff will ALWAYS cloak an object no matter what the time is. To fix this, we'll utilize our IsNight validator. If you look near the bottom of the Night Cloak fields you'll see a field called "Validators (Disable)". Click the Validators (Disable) field to open up a list. Click the little green X and add the IsNight Validator. Click OK.
This makes our buff disable anytime the IsNight validator fails. So, if it's daytime, the buff will be disabled. Notice there is also a Validator (Remove) field. This does just as you'd expect and removes the buff from the unit if the validator fails.
Finally, to make our buff more user friendly Change the Tooltip Field and set enter a message that will appear as the tooltip when the player hovers his mouse over the buff icon. I wrote "Cloaks the unit at night". The final fields of the Buff should be like the following:
The Unit
So we have our Buff ready to go and it uses our new IsNight validator. It's time now to create a unit that has Night Cloak as a buff.
In the Data Editor, Change the Data Type to Units. Find the Dark Templar Unit. Right click it and Duplicate the Dark Templar. In the tree that pops up, all we need to copy are the Actors. So, Check the Actors Folder to select everything inside of it. Click OK. Note we are not copying everything else because we are not modifying anything besides some unit flags. We have to copy the actor because we need an Actor object to reference this unit so that it will be attached to a visual representation of the Dark Templar. Actor can only be associated with a single Unit.
First things first, we certainly don't want this unit to be called "Dark Templar Copy". So Right Click the Dark Templar Copy on the left panel and click "Modify Object...". Change the name to "Night Templar" then click Suggest and Click OK.
With Night Templar selected, we need to set some important fields. First, since the Night Templar has the same settings as the Dark Templar at the moment, it will be cloaked all the time automatically. To disable this we need to disable the Cloaked flag. Double click the Stats - Flags field and uncheck the Cloaked box. Now the unit will not be cloaked all the time.
It's now time to add our Night Cloak buff to the Night Templar. Click the (None) Behaviors + field. A window should pop up, Click the green X and add the Night Cloak behavior After it is added Click OK.
Now our unit has the Night Cloak buff! The buff will handle enabling or disabling the Night Templar's cloaking based on the Time of Day.
Speeding Up the Time of Day
With our Night Templar created, we probably would like to see our new Night Cloak buff in action. To do this, we need to setup a trigger to speed up the time of day progression a bit so that we can see the Cloaking enable and disable based on the time.
Open the Trigger Editor and select the Map Initialization trigger. Delete all of the actions for the trigger. Now, with the Map Initialization trigger still selected Click the Add Action button and a new menu should pop up. With the "Environment" heading selected on the left select "Set Day Length" and click OK. We've now added an action that will set the length of the game day.
With the Set Day Length action selected, click the linked 300.0 and change it to 30.0. This will make a "day" 30 seconds long.
Use the editor to place a Night Templar on the map for Player 1, and test out the map. You should see the unit cloak and decloak as time goes on!
Adding a Clock (Optional)
Having this functionality of time based buffs is pretty neat, but it invites the question, how do we tell the player what time it is in the game? Luckily this isn't too difficult to setup using some trigger play. This part of the tutorial assumes you have used triggers before and are comfortable moving around the editor.
Building the Dialog
Our clock will use SC2's Dialog system to show a little UI clock at the top of the screen. Add a new global variable of type Dialog Item name ClockDisplay. Leave the default value as it is.
One issue we need to address is conversion of the Time of Day variable type to a string for displaying purposes. Create a new Function called "TimeOfDayToString and set it as follows:
Convert Time Of Day To String
Options: Function
Return Type: String
Parameters
Time Of Day = 00:00:00 <Time Of Day>
Grammar Text: convert Time Of Day to string
Hint Text: Converts a time of day value to a string.
Custom Script Code
Local Variables
Actions
General - Return lp_timeOfDay
Thanks to Nevir for this function
Now, select the Map Initialization trigger and add a Create Dialog action. Change it to "relative to Top of screen" and leave the other settings. Add a Show/Hide Dialog action. Change the action to Show instead of Hide. Add a Create Dialog Item (Label) action. Change the Text parameter to take a conversion from String to Text, and then change the string to be TimeOfDayToString function we added, and then pass in the function Get Current Time of Day function to that. The resulting action should be as follows:
Dialog - Create a Label for Dialog (Last created dialog) with the dimensions (200, 50) anchored to Center with an offset of (50, 50) with the text (Text((TimeOfDayToString((Current game time of day))))) color set to White text writeout set to false with a writeout duration of 2.0
Add a Set Variable action and change the variable to ClockDisplay and the value to Last Created Dialog Item. We now have a reference to this label.
Add a Show/Hide Dialog Item action and set it to Show.
Add a new Trigger and add an event Timer -> Periodic Event and set the period to 1.0 second. In the actions for this trigger add a Set Dialog Item Text action. Change the first parameter to ClockDisplay and change the Text parameter to the string-to-text, TimeOfDayToString, Current Time of Day setup that we used in the Label creation action. Now the label will be updated every second with the new time.
You should now have an ingame clock that the player can use to figure out when buffs will be activated.