Create a Hero with Attributes
| Author: Khlox (hiveworkshop.com) | Tags: intermediate data hero ability | |
| Source: http://www.hiveworkshop.com/forums/... | Added 15 years ago |
As known, many people want to make a map which has a hero as main unit for the player, but not just any hero, but a hero like in Warcraft 3, with attributes and spells that will level. And happy me I happened to stumble over it how to, so here I go...
Example map: (link)
Have fun reading this wall of text! :O
[Just for the record: my first tutorial, and so far I know, it meets the guidelines. :3]
TABLE OF CONTENT:
CREATE YOUR HERO:
So, we first need a hero unit. This doesn't necessarily have to be a new unit, but if you want, create a new one. I'm taking our beloved Zergling as an example unit, and the only thing I did, was rename it to Ling.
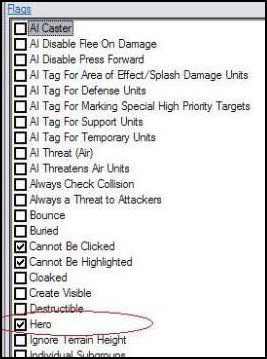
Then, there's one small thing to do: go to 'Unit - Flags' (at the bottom), and open it. Check 'Hero' and you're done there for now.
The field.
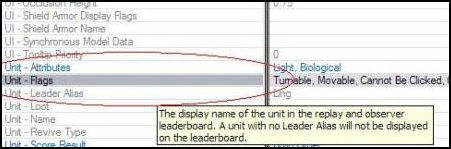
Checking 'Hero':
VETERANCY: THE LEVEL UP SYSTEM.
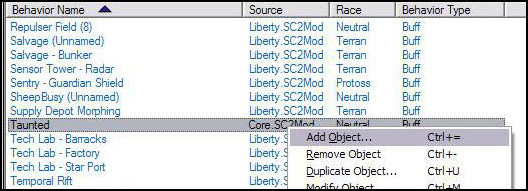
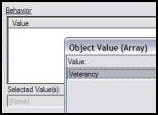
As shown in multiple tutorials, also this one uses the Veterancy behavior. Go to the Behavior tab, rightclick on any behavior, and select 'Add Object...', and do the following steps:
1. Set 'Name' to Veterancy (or anything that suits you).
2. For the ID', press 'Suggest', the easiest way, or set an ID yourself (can't override).
3. Set 'Behavior Type' to 'Veterancy'.
Adding the object:
Setting the values:

Bam, done. Now make sure these five buttons (see image) are pressed like in the image.
Buttons:
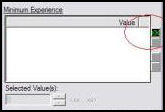
Once that is done, we now need to set the experience values which are needed for the next level. For this, find the field called 'Behavior - Veterancy Levels - Minimum Experience'. Double click to open it.
The field:

At first sight, this is an empty field. So, we need to add some values. For the first level (which goes from level 0 to level 1), we'll need to do some steps:
1. Press that tiny little green '+X' to add a new value. A new screen will open.
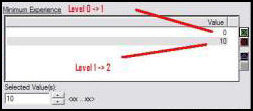
2. In Warcraft 3, heroes start at level 1, while in SC2, they'll start at level 0. We also want them to start at level 1, and since this represent the first step (from 0 => 1), we'll set this to '0' (zero), so the unit will instantly start at level 1.
Setting values:

Now, these values are represented in a way that the one at the top represents the experience EXTRA needed to go from level 0 to level 1, and the second one is from level 1 to level 2.
Also, the values add up: If the first value is 10, and the second one is 20, the TOTAL value to go from level 1 to level 2 is 30. (10 + 20 = 30, simple.) In other words: it shows how much XP you need to level again, from the level before.
So lets say we need 10 experience to go from level 1 to level 2, you'll set the second field to '10'. And if you want to go from level 2 to level 3 with a need of 30 XP -TOTAL-, you'll set the value to 20.
Example:
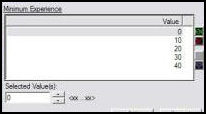
For this tutorial, I'll use the following values:
Level 0 -> Level 1: 0 XP. (Instant at level 1.)
Level 1 -> Level 2: 10 XP. (10 XP total.)
Level 2 -> Level 3: 20 XP. (30 XP total.)
Level 3 -> Level 4: 30 XP. (60 XP total.)
Level 4 -> Level 5: 40 XP. (100 XP total.)
My values.
So, now the only thing we'll still need to do, is add this Behavior to our Hero, for me, my Ling, and it will level up gradually.
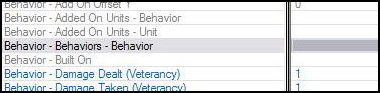
Go to your Hero, and find the field called 'Behavior - Behaviors - Behavior' (yeah, this is serious... 3x behavior...) Press the little green '+X' and search for your Veterancy behavior, and add it. Done! Your unit will now level up when killing units!
The field:
The value:
(Feel free to test it, place your unit in the terrain with some enemy workers around it, and watch them fall! Muahahahah!)
*NOTE* Experience sharing isn’t there in default. I’ll show how to later on.
And then now, the harder part:
ATTRIBUTES: HELL, IT'S ABOUT TIME!
But, before we do this, let’s make a list of what you want for attributes exactly, and keep in mind: it's a Zergling.
This is what I had in mind:
1. Strength:
* Increases hit points / life by 5.
* Increases damage by 1.
2. Agility:
* Increases attack speed by 5%.
* Increases movement speed by 5%.
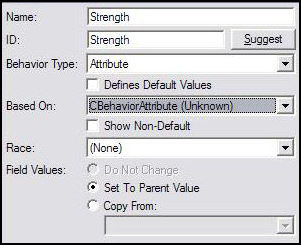
Now your attributes are settled, go to Behavior tab. Our first attribute to create will be Strength, and to do so, follow the following steps:
1. Rightclick any behavior, and select 'Add Object...'.
2. Set 'Name' to your attribute name.
3. Set 'ID' either by using 'Suggest' or setting it yourself.
4. Keep 'Behavior Type' on 'Attribute'.
5. Hit OK!
The fields.
So, now you have your attribute... But it doesn't do anything yet! This is our Strength attribute, so it'll have to do the following things:
* Increases hit points / life by 5.
* Increases damage by 1.
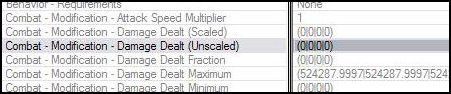
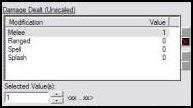
First, we'll set the damage. Find the field called 'Combat - Modification - Damage Dealt (Unscaled)', and double click it.
It will show 4 fields: Melee, Ranged, Spell and Splash. Our Ling is a melee unit, so select 'Melee', and as it increases it 1 per attribute, we'll set it to 1.
The field:
Setting the Melee damage:
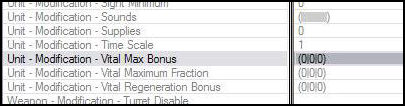
Secondly, we'll set the extra Life. Find the field called 'Unit - Modification - Vital Max Bonus', and double click it.
Select the value called 'Life' and set it to 5.
The field:
Setting the extra Life:
Wham! Your first attribute is done! But, your unit doesn't have it yet. So go back to your unit, and once again to the field 'Behavior - Behaviors - Behavior', and add a new one. Find your attribute (for me, Strength) and add it. My Ling / your hero has now the attribute Strength!
But wait! If your hero levels now, the attribute doesn't go up! So we'll need to settle that now.
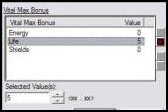
Go back to your Veterancy Behavior, and find the field called 'Behavior - Veterancy Levels - Modification - Attribute Changes - Attribute' (what a name...), and double click it.
Then press the little, but most beloved green '+X', and find your attribute, or for me: Strength.
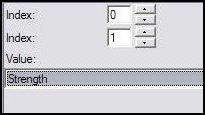
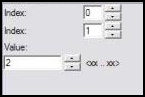
Now as you see, there are also two other values: Index and, oh, surprise!, Index.
Now, after some testing, I found out the first Index represent the level the unit will level FROM. So, if you level from level 0 to level 1, the first Index will be 0. However, this means, if you want to go from level 1 to level 2, you'll need to ANOTHER value. The first field will represent from level 0 to level 1, or in other words: your starting values, as our hero will instantly go to level 1.
The second Index is used to make difference between different attributes, and as this is your first attribute, set it to 1.
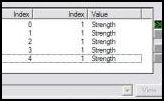
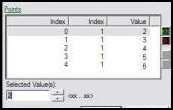
We'll also add the values for the next levels, so in the end, it will look like the last image in the hidden tags.
The field:

The values:
The ending values:
However, this doesn't mean that the attributes will also rise when you level up. Go to the field below the field we were just at (''Behavior - Veterancy Levels - Modification - Attribute Changes - Points'), and double click it.
We'll first want to set the starting values of our attribute, so press the little green '+X' again.
Now, the first 'Index' once again represent the level which it will level FROM (as explained before), and, as we're setting the starting values, this must be 0.
The second 'Index' represent the attribute, and the 'Index' for our Strength attribute is '1', so set it to '1'.
The 'Value' represents the value of what the attribute is at when you’re on that level. So if you set it to 2, it’ll be 2. However, if you set the next level to 1, it will be reduced when you level! So keep that in mind.
Setting the fields:
However, you need to set this for every single level, and every single attribute at a time: it'll take long.
If the attribute rises with 1 every level, it should look like this in the end.
End result:
And then, with this all FINALLY done, your attribute should now finally rise when leveling! Congratulations!
XP SHARING: SO WE LEARN FROM OTHERS, NOW?!
As I said, XP sharing isn’t turned on on default, so if a unit which is not the hero kills a unit, the hero won’t gain anything.
Hero
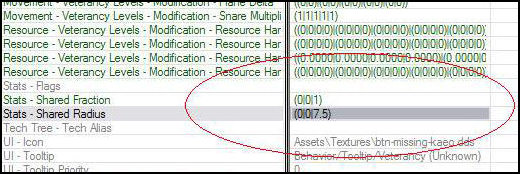
So, go back to your Veterancy behavior, and search for the field called ‘Stats – Shared Fraction’, and double click it. Select the ‘Kills’ type and set its value to 1. Or less, if you want to. This value determines how much XP is shared with the units around him, in which 1 represents 100% share, and 0.5 only 50%. Be careful with setting it too high! Above one means the killing unit receives NO XP, but LOOSES XP.
Now the next field you need, is right under it. Double click the ‘Stats – Shared Radius’ field and select ‘Kills’again. Set the radius to whatever radius you want. I’ll set it to 7.5, an average radius, and, I think, near to similar in Warcraft 3.
From this…

To this!
Optional:
If you want your hero to still ‘leech’ XP when a unit dies, and the hero is at a maximum level, then go to the field ‘Behavior – Flags’ and check ‘Maximum Level Leech’.
Now, every unit with this behavior will share XP with other. However, a unit without this ability, won’t! So we need to make a ‘dummy’ behavior for non-hero units, so they’ll also share XP.
Non-hero
Make a new behavior by using ‘Add Object…’, and call it Veterancy (DUMMY). Once again, go to the field ‘Stats – Shared Fraction’ and do the same as above. The same counts for ‘Stats – Shared Radius’.
Once that is done, select the field ‘Stats – Flags’, and, surprise surprise!, check the only field available there: ‘Hidden’. Now the XP-bar won’t show up when a unit has this behavior, but it will share experience! Add this behavior to EVERY unit that will be in your game, so your hero will gain experience when this unit kills someone.
ABILITY LEVELING: FEELING STRONGER EVERY TIME I PRESS THOSE BUTTONS - AGAIN.
ALSO: HUGE WALL OF TEXT INCOMING. ANY SIDE EFFECTS OF READING THIS ARE: BRAIN OVERFLOW: CAUSING EITHER A MINOR TO HUGE HEADACHE OR MAYBE EVEN A BRAIN EXPLOSION / IMPLOSION; HURTING EYES: THEY MIGHT JUST... STOP WORKING FOR A WHILE; BUT MOST IMPORTANT: LOSING THE DESIRE TO MAKE A FULLY FUNCTIONAL WARCRAFT 3 HERO IN STARCRAFT 2. YEAH, IT SUCKS. YOU HAVE BEEN WARNED.
Oh yes, oh yes! After following a tutorial from Prancer at sc2mapter.com (Linky!) I managed to get it going. And thus, I’m adding it to my tutorial as well, in my own words of course. But first, a huge thanks to Prancer!
The Hero ability
So, sticking to the idea our little hero Ling is a Zergling, we need a suiting ability which fits with the unit. My thought were something like this:
* Adrenaline Boost:
* Temporarily increases movement speed and attack speed.
Lasts 5 seconds.
8 seconds cooldown.
*
1. Increases MS and AS by 25%.
2. Increases MS and AS by 50%.
3. Increases MS and AS by 75%.
A pretty basic ability. So, now let’s get to making it. Go to the ability tab and duplicate the Marine – Stimpack ability. Duplicate the Actors, Behaviors, Buttons and Effects.
Rename the duplicating things related to the ability to Adrenaline Boost, just to make it all a little more clear.
Making the buttons
Ability button
Button for your ability
Duplicate any button, and do the following things:
* Set ‘Name’ to ‘Adrenaline Boost’.
* Set ‘Tooltip’ to a descriptive text which explains what the ability does and what increases per level, e.g.: ‘Ling gets an energy shot and so has his movement and attack speed increased for 5 seconds.<n/><n/><c val="FFCC00"> Level 1 - 25% increase.<n/> Level 2 - 50% increase.<n/> Level 3 - 75% increase.<n/><n/>8 seconds cooldown.</c>’
* Set the icon to a fitting icon, I chose: ‘Assets/Textures/btn-upgrade-zerg-metabolicboost.dds’
* Setting a hotkey. I chose Q. (Yeah, QWERTY-keyboard. :o)
Hero tab button
This button will be the button to open the tab to the sheet where you can level your abilities, as in Warcraft 3.
Once again, duplicate any button, and do the following:
* Set a name, something like ‘Learning Tab’ or something.
* Set a tooltip. I have: ‘Opens the ability learn tab.’
* Set an icon that fits the button. I used the icon for the Unburrow ability of the Zerg, it suits him.
* Set a hotkey. I used R.
Cancel button
The button for returning to the normal command sheet.
Copy any cancel button and rename the tooltip to something useful, e.g.: ‘Returns to the normal command sheet.’
Alright, the buttons are done now.
Editing the effects of the ability
Alright, first we’ll work on the effects of the ability. Open the ‘Effects’ tab and search for the related effect. (If renamed: search for ‘Adrenaline’, else for ‘Stimpack Copy’.)
Duplicate this effect twice, including the Behaviors with it.
Remove the ‘Copy’ out of the name, and set for each effect and behavior a suffix (field: ‘Editor – Editor Suffix’) regarding the level of the ability. So something similar like [1] for the effect when the ability is at level 1, [2] for 2, etc.
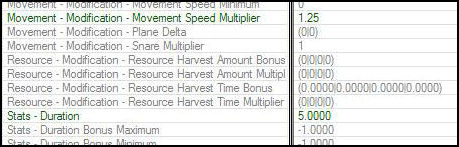
Then go to the ‘Behavior’ tab. Find the behaviors related to the ability, and search for the field called ‘Combat – Modification – Attack Speed Multiplier’. For the level 1 behavior, set it to 1.25 (25% increase), for level 2 to 1.5 (50% increase) and for level 3 set it to 1.75 (75% increase).
Do the same as above for the field called ‘Movement – Modification – Movement Speed Multiplier’.
The field called ‘Stats – Duration’ is close under the ‘Movement’ fields, and must be set to 5 seconds, since that’s the time the effect will endure.
Then go to the field ‘UI – Icon’ and set it to the icon you also used for the buttons (‘Assets/Textures/btn-upgrade-zerg-metabolicboost.dds’).
Then double click the field below it (‘UI – Tooltip’) and set it to something that suits the ability. I set it to ‘This unit has an Adrenaline Boost; it moves and attacks faster.‘ Do this for every level of the ability.
The effects and name…

The behaviors and name…

(As you can see, this map has more custom units / effects / behaviors. :P)
Where to find the fields…

Editing the ability itself
You’re now done working on the effects and everything, let’s move on to the ability itself. Go to the ‘Ability’ tab, and go to your ability.
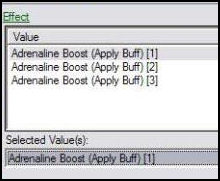
Go to the field ‘Effect – Effect’ and double click it. Right now, there should be either one of the following effects in the list:
1. Adrenaline Boost (Apply Buff) [1]
2. Adrenaline Boost (Apply Buff) [2]
3. Adrenaline Boost (Apply Buff) [3]
In order to make the ability have more than one level, we need to add more effects. In order to do this, press the little green ‘+X’, and find the other two effects. Arrange them in the level order, and you’re done at this field. There are a few more fields to change and add extra values to for the levels, which are:
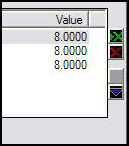
* ’Cost – Cost – Cooldown – Time Use’: set it to the cooldown of the ability (8 seconds). Add two extra values for the levels.
* ’Cost – Cost – Cooldown – Location’: keep it at ability. Add two extra values for the levels.
* ’Cost – Cost – Cooldown – Link’: keep it at the current link. Add two extra values for the levels and set both to the link the original one has. If you have more abilities on your hero, make sure this field doesn’t overlap with each other (same values), because then the abilities will have a shared cooldown.
One final thing to do: remove the requirement in the field ‘Ability – Commands – Requirements’. Now, the ability itself is done, but now we need to do the leveling part, which is not too hard once you know how to do it.
’Effect – Effect’ settings…
Cooldown fields…

Settings…
The learning ability
Alright, stick to the ‘Ability’ tab and add a new object. Set his name to something like ‘Ling Learn’ and use suggest ID. Set the ‘Ability Type’ to ‘Learn’ and set a race if you want. Hit OK.
Settings…
First, we’ll edit some of the basic things, such as the points you receive per level you gain. Go to the field ‘Ability – Points Per Level’ and set it to 1 if you want 1 point per level, 2 if you want 2 per level, etc. The field ‘Ability – Points’ sets the value of starting points, but as our hero already starts at level 1, it’ll already gain a point from the ‘Ability – Points Per Level’ field.
For any non-Warcraft 3 players: with each point, you can level one of your abilities once.
Optional:
Setting a sound for when you level an ability: go to the field ‘UI – Error Alert’, and set a sound to your liking. It’ll play when you level an ability.
Now, make sure the button ‘Combine Structure Values’ is pressed/checked!
THIS IS THE SPOT!!!!!
When that is done, double click the field ‘Ability – Info +’, and press on the value (at the top) which has the Index ‘Learn 1’. Now there are a few things to do in these fields, which are:
* Check ‘Hide Count’ so it’s Enabled. (Near the top.)
* Set ‘Default Button’ to the button you made for the ability. (Near the bottom.)
* Set ‘Ability’ to ‘Adrenaline Boost’. (Near the bottom.)
Alright, the learning ability is done – for now! If you want to add more abilities, use the other Indexes ‘Learn #’ to add them. (With a maximum of 20 abilties! Nice.)
The settings…
Adding the abilities to your unit
Back to the ‘Unit’ tab and select your hero.
Double click the field ‘Ability – Abilities +’ and make sure the only abilities available are the abilities ‘Stop’, ‘Attack’ and ‘Move’. Now press our beloved, little green ‘+X’ and search for the learning ability (the ability we just worked on). Add it. Do the same for the ability that needs to be taught, so in my case: Adrenaline Boost. Hit OK, you’re done there.
Next stop is the field ‘Ability – Command Card +’, double click it. There, remove all the buttons except the 5 buttons at the top row.
Then select the button position at the bottom row and at the first column. Press the little green ‘+X’ and choose the button you made for the ability itself. Hit OK. Set the ‘Command Type’ to ‘Ability Command’, keep ‘Requirements’ at none, set the ‘Ability’ to your ability and then the ‘Ability Command’ also to your ability.
Now, you’d think, you can already use the ability while you didn’t even level it! Q.Q, that ain’t no fun! But, no, that’s not what will happen, because the SC2 engine is smart, and detected your learning ability which contains the ability that will be taught, and will only show the ability once you have leveled it. So no worries.
Abilities field… (Should be anything like this.)
Settings of the button…
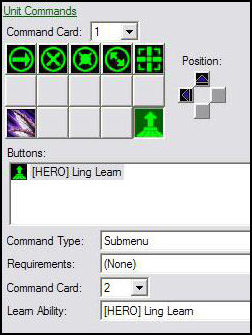
Now, as in Warcraft 3 the hero learning tab has an own tab, we’ll do the same here: select the button position at the bottom row, last column and press the little green ‘+X’. Pick the button you made to go from this tab to the hero learning tab (the ‘Hero tab button’ we made earlier). Now set its ‘Command Type’ to ‘Submenu’, keep ‘Requirements’ at none, set ‘Command Card’ to 2 (currently we’re working at sheet 1) and set ‘Learn Ability’ to our learning ability. This button is done now.
Settings of the button…
Now make your way to sheet 2. First of all, we need to make a button to return to our normal sheet. Once again, select the button position at the bottom row, last column and now pick your ‘Cancel’ button, and set the ‘Command Type’ to ‘Cancel Submenu’.
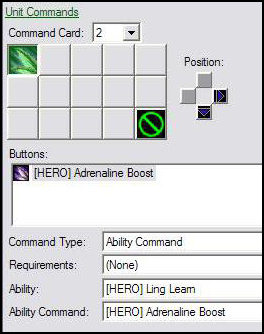
Next, we’ll add the button to make your hero actually learn the ability. Select the button position at the top row, first column and press that little green ‘+X’ and pick the button for your ability. Set the ‘Command Type’ to ‘Ability Command’, keep ‘Requirements’ at none, set ‘Ability’ to your learning ability and then set ‘Ability Command’ to the ability you want to learn with your button.
Settings of the buttons at card…
Congratulations! Your hero will now be able to learn an ability. If you want, feel free to test and do whatever you want with your hero.
But, while doing so, you’ll find out that when you’re at level 1, you can level your ability, which is good. But when you hit level 2, you can level it again! And that isn’t good, because it shouldn’t be able to level until you hit level 3. So what’s the problem? Indeed, requirements, which we’ll add now. What you also might’ve noticed, is that the ability button to learn the ability won’t go away once the ability reached the maximum level.
The requirement
Making it
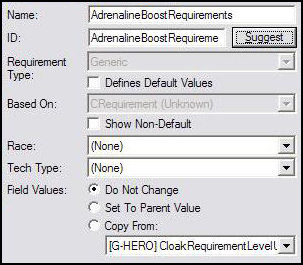
Go to the ‘Requirements’ tab and add a completely new requirement, and then name it a proper way.
(NOTE: for each ability you’ll want to learn, you need to make AT LEAST ONE requirement, but once you know it, it isn’t really hard.)
Yeah, not really needed, but hell.
Adding it to your ability
There are two ways to do this: add the requirement at the Command Sheet and then at the learning button for the ability (less preferred to me), or by adding it at the learning ability in the learning tab (preferred by me). We’ll do it by my preferred way. (Also the way in which it will bug out less easily. :o )
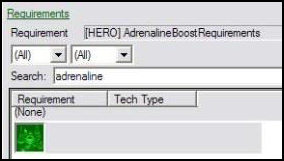
Go back to your learning ability, and go to the field ‘Ability – Info +’, and select the value with Index ‘Learn 1’. There, find the requirement field, and then find your requirement (use search if needed). Add it. You’re done here now.
However, the requirement doesn’t do anything yet, so we’ll have to modify it.
The place!
Modifying the requirement
Now back to your requirement.
Double click the field ‘Requirement +’, and at first sight, you’ll think something like ‘what the bloody..!’, but don’t worry, it really isn’t that hard. I’ll guide you guys through this one.
First, we’ll make the button disappear once the ability reaches level 3. (Or, the maximum level.) The way we’ll do this, is making a ‘condition’ to it: if the ability level of the ability you want to learn less than the maximum level, show it, else hide it.
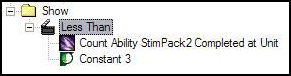
Right click on the folder ‘Show’ and click ‘Add Requirement Node’. An ‘And’ will now appear, which is a node. Press this node and change its ‘Type’ to ‘Less than’. Then right click that node and add two more requirement nodes.
Change the first added node ‘Type’ into ‘Count Ability’. Some more fields will appear. Set ‘Alias’ to your ability you want to learn and ‘State’ to ‘Completed at Unit’, so this requirement only works on this single unit, so to say.
Then to the second added node. Change ‘Type’ into ‘Constant’, and set its ‘Value’ to 3.
Now, the button will disappear when it will reach it maximum level, which is 3. If you want, test it.
This is how it should look like…
’”Expression code.”’
If it doesn’t work out for you by using these nodes, set the tab to ‘Expression’, and add this line of code:
Code:
CountAbil(StimPack2,CompleteOnlyAtUnit) < 3
Once that is done, go back to the ‘Tree’ tab, and make sure the ‘Alias’ is set to the right ability. Woosh, done.
So now to the ‘Use’ folder. The button may only be pressed once the level of the hero is equal to or greater than ((Ability level * 2) + 1) [do the maths, it’s this way: level 0 -> level 1: hero should be at level 1; level 1 -> level 2: hero should be at level 3, etc.].
Add a new node, and set his type to ‘Greater Than or Equal To’. Add two new nodes to this field.
The first node’s ‘Type’ will be set to ‘Count Behavior’, the ‘Alias’ to your VETERANCY behavior and the ‘State’ to ‘Completed at Unit’.
The second node must be set to ‘Sum’. Then add THREE new nodes to that field.
Both the FIRST and the SECOND node must be set to the following: ‘Type’ to ‘Count Ability’, ‘Alias’ to the ability you want to learn and ‘State’ to ‘Completed at Unit’. Since there is no multiply in this, you’ll just need to add it twice, which are the first and second node.
The THIRD node must be set to ‘Constant’, and its value to ‘1’.
Now there’s one more thing to do, and that is enter what the requirement will say when it’s not reached. (E.g.: you don’t have a Tech Lab on your Barracks, but you want to train a Marauder, and the button says: Tech Lab required! Muahahahah!)
So, press the ‘Greater Than or Equal To’ node and select the ‘tooltip’ field. Anything you enter in here, will be the ‘warning’ (Tech Lab required!), I entered ‘Hero at corresponding level’.
NOTE: you can’t enter values for each level of the ability, so it won’t be like in WC3. That’s why I chose for my sentence.
This is how it should look like…
’”Expression code.”
Once again, it doesn’t work out? Go to the ‘Expression’ tab and this line of code:
Code:
CountBehavior(Veterancy,CompleteOnlyAtUnit) >= {Hero at corresponding level}(CountAbil(StimPack2,CompleteOnlyAtUnit) + CountAbil(StimPack2,CompleteOnlyAtUnit) + 1)
Again, make sure the ‘Alias’ of the first two nodes are set to the ability you want to learn.
Now, you’re done! The ability should level properly now and disappear when it reaches the maximum level. Happy me, happy you. It’s wonderful and actually so easy once you understand how it works.
Yeah, still no agility attribute… I’m just too… lazy do to it right now. Besides, aren’t you happy you already have a working hero?! Pfff.
Interesting stuff about the tutorial.
The attached map is the full tutorial so far. Place the map in 'My Documents/Starcraft II Beta/Maps' to be able to open it with the editor.
Example map: (link)
Example map: (link)
Have fun reading this wall of text! :O
[Just for the record: my first tutorial, and so far I know, it meets the guidelines. :3]
TABLE OF CONTENT:
- Create your hero.
- Veterancy: the level up system.
- Attributes: Hell, it's about time!
- XP sharing: so we learn from others now?!
- Ability leveling: feeling stronger every time I press those buttons – again.
CREATE YOUR HERO:
So, we first need a hero unit. This doesn't necessarily have to be a new unit, but if you want, create a new one. I'm taking our beloved Zergling as an example unit, and the only thing I did, was rename it to Ling.
Then, there's one small thing to do: go to 'Unit - Flags' (at the bottom), and open it. Check 'Hero' and you're done there for now.
The field.
Checking 'Hero':
VETERANCY: THE LEVEL UP SYSTEM.
As shown in multiple tutorials, also this one uses the Veterancy behavior. Go to the Behavior tab, rightclick on any behavior, and select 'Add Object...', and do the following steps:
1. Set 'Name' to Veterancy (or anything that suits you).
2. For the ID', press 'Suggest', the easiest way, or set an ID yourself (can't override).
3. Set 'Behavior Type' to 'Veterancy'.
Adding the object:
Setting the values:
Bam, done. Now make sure these five buttons (see image) are pressed like in the image.
Buttons:
Once that is done, we now need to set the experience values which are needed for the next level. For this, find the field called 'Behavior - Veterancy Levels - Minimum Experience'. Double click to open it.
The field:
At first sight, this is an empty field. So, we need to add some values. For the first level (which goes from level 0 to level 1), we'll need to do some steps:
1. Press that tiny little green '+X' to add a new value. A new screen will open.
2. In Warcraft 3, heroes start at level 1, while in SC2, they'll start at level 0. We also want them to start at level 1, and since this represent the first step (from 0 => 1), we'll set this to '0' (zero), so the unit will instantly start at level 1.
Setting values:
Now, these values are represented in a way that the one at the top represents the experience EXTRA needed to go from level 0 to level 1, and the second one is from level 1 to level 2.
Also, the values add up: If the first value is 10, and the second one is 20, the TOTAL value to go from level 1 to level 2 is 30. (10 + 20 = 30, simple.) In other words: it shows how much XP you need to level again, from the level before.
So lets say we need 10 experience to go from level 1 to level 2, you'll set the second field to '10'. And if you want to go from level 2 to level 3 with a need of 30 XP -TOTAL-, you'll set the value to 20.
Example:
For this tutorial, I'll use the following values:
Level 0 -> Level 1: 0 XP. (Instant at level 1.)
Level 1 -> Level 2: 10 XP. (10 XP total.)
Level 2 -> Level 3: 20 XP. (30 XP total.)
Level 3 -> Level 4: 30 XP. (60 XP total.)
Level 4 -> Level 5: 40 XP. (100 XP total.)
My values.
So, now the only thing we'll still need to do, is add this Behavior to our Hero, for me, my Ling, and it will level up gradually.
Go to your Hero, and find the field called 'Behavior - Behaviors - Behavior' (yeah, this is serious... 3x behavior...) Press the little green '+X' and search for your Veterancy behavior, and add it. Done! Your unit will now level up when killing units!
The field:
The value:
(Feel free to test it, place your unit in the terrain with some enemy workers around it, and watch them fall! Muahahahah!)
*NOTE* Experience sharing isn’t there in default. I’ll show how to later on.
And then now, the harder part:
ATTRIBUTES: HELL, IT'S ABOUT TIME!
But, before we do this, let’s make a list of what you want for attributes exactly, and keep in mind: it's a Zergling.
This is what I had in mind:
1. Strength:
* Increases hit points / life by 5.
* Increases damage by 1.
2. Agility:
* Increases attack speed by 5%.
* Increases movement speed by 5%.
Now your attributes are settled, go to Behavior tab. Our first attribute to create will be Strength, and to do so, follow the following steps:
1. Rightclick any behavior, and select 'Add Object...'.
2. Set 'Name' to your attribute name.
3. Set 'ID' either by using 'Suggest' or setting it yourself.
4. Keep 'Behavior Type' on 'Attribute'.
5. Hit OK!
The fields.
So, now you have your attribute... But it doesn't do anything yet! This is our Strength attribute, so it'll have to do the following things:
* Increases hit points / life by 5.
* Increases damage by 1.
First, we'll set the damage. Find the field called 'Combat - Modification - Damage Dealt (Unscaled)', and double click it.
It will show 4 fields: Melee, Ranged, Spell and Splash. Our Ling is a melee unit, so select 'Melee', and as it increases it 1 per attribute, we'll set it to 1.
The field:
Setting the Melee damage:
Secondly, we'll set the extra Life. Find the field called 'Unit - Modification - Vital Max Bonus', and double click it.
Select the value called 'Life' and set it to 5.
The field:
Setting the extra Life:
Wham! Your first attribute is done! But, your unit doesn't have it yet. So go back to your unit, and once again to the field 'Behavior - Behaviors - Behavior', and add a new one. Find your attribute (for me, Strength) and add it. My Ling / your hero has now the attribute Strength!
But wait! If your hero levels now, the attribute doesn't go up! So we'll need to settle that now.
Go back to your Veterancy Behavior, and find the field called 'Behavior - Veterancy Levels - Modification - Attribute Changes - Attribute' (what a name...), and double click it.
Then press the little, but most beloved green '+X', and find your attribute, or for me: Strength.
Now as you see, there are also two other values: Index and, oh, surprise!, Index.
Now, after some testing, I found out the first Index represent the level the unit will level FROM. So, if you level from level 0 to level 1, the first Index will be 0. However, this means, if you want to go from level 1 to level 2, you'll need to ANOTHER value. The first field will represent from level 0 to level 1, or in other words: your starting values, as our hero will instantly go to level 1.
The second Index is used to make difference between different attributes, and as this is your first attribute, set it to 1.
We'll also add the values for the next levels, so in the end, it will look like the last image in the hidden tags.
The field:
The values:
The ending values:
However, this doesn't mean that the attributes will also rise when you level up. Go to the field below the field we were just at (''Behavior - Veterancy Levels - Modification - Attribute Changes - Points'), and double click it.
We'll first want to set the starting values of our attribute, so press the little green '+X' again.
Now, the first 'Index' once again represent the level which it will level FROM (as explained before), and, as we're setting the starting values, this must be 0.
The second 'Index' represent the attribute, and the 'Index' for our Strength attribute is '1', so set it to '1'.
The 'Value' represents the value of what the attribute is at when you’re on that level. So if you set it to 2, it’ll be 2. However, if you set the next level to 1, it will be reduced when you level! So keep that in mind.
Setting the fields:
However, you need to set this for every single level, and every single attribute at a time: it'll take long.
If the attribute rises with 1 every level, it should look like this in the end.
End result:
And then, with this all FINALLY done, your attribute should now finally rise when leveling! Congratulations!
XP SHARING: SO WE LEARN FROM OTHERS, NOW?!
As I said, XP sharing isn’t turned on on default, so if a unit which is not the hero kills a unit, the hero won’t gain anything.
Hero
So, go back to your Veterancy behavior, and search for the field called ‘Stats – Shared Fraction’, and double click it. Select the ‘Kills’ type and set its value to 1. Or less, if you want to. This value determines how much XP is shared with the units around him, in which 1 represents 100% share, and 0.5 only 50%. Be careful with setting it too high! Above one means the killing unit receives NO XP, but LOOSES XP.
Now the next field you need, is right under it. Double click the ‘Stats – Shared Radius’ field and select ‘Kills’again. Set the radius to whatever radius you want. I’ll set it to 7.5, an average radius, and, I think, near to similar in Warcraft 3.
From this…
To this!
Optional:
If you want your hero to still ‘leech’ XP when a unit dies, and the hero is at a maximum level, then go to the field ‘Behavior – Flags’ and check ‘Maximum Level Leech’.
Now, every unit with this behavior will share XP with other. However, a unit without this ability, won’t! So we need to make a ‘dummy’ behavior for non-hero units, so they’ll also share XP.
Non-hero
Make a new behavior by using ‘Add Object…’, and call it Veterancy (DUMMY). Once again, go to the field ‘Stats – Shared Fraction’ and do the same as above. The same counts for ‘Stats – Shared Radius’.
Once that is done, select the field ‘Stats – Flags’, and, surprise surprise!, check the only field available there: ‘Hidden’. Now the XP-bar won’t show up when a unit has this behavior, but it will share experience! Add this behavior to EVERY unit that will be in your game, so your hero will gain experience when this unit kills someone.
ABILITY LEVELING: FEELING STRONGER EVERY TIME I PRESS THOSE BUTTONS - AGAIN.
ALSO: HUGE WALL OF TEXT INCOMING. ANY SIDE EFFECTS OF READING THIS ARE: BRAIN OVERFLOW: CAUSING EITHER A MINOR TO HUGE HEADACHE OR MAYBE EVEN A BRAIN EXPLOSION / IMPLOSION; HURTING EYES: THEY MIGHT JUST... STOP WORKING FOR A WHILE; BUT MOST IMPORTANT: LOSING THE DESIRE TO MAKE A FULLY FUNCTIONAL WARCRAFT 3 HERO IN STARCRAFT 2. YEAH, IT SUCKS. YOU HAVE BEEN WARNED.
Oh yes, oh yes! After following a tutorial from Prancer at sc2mapter.com (Linky!) I managed to get it going. And thus, I’m adding it to my tutorial as well, in my own words of course. But first, a huge thanks to Prancer!
The Hero ability
So, sticking to the idea our little hero Ling is a Zergling, we need a suiting ability which fits with the unit. My thought were something like this:
* Adrenaline Boost:
* Temporarily increases movement speed and attack speed.
Lasts 5 seconds.
8 seconds cooldown.
*
1. Increases MS and AS by 25%.
2. Increases MS and AS by 50%.
3. Increases MS and AS by 75%.
A pretty basic ability. So, now let’s get to making it. Go to the ability tab and duplicate the Marine – Stimpack ability. Duplicate the Actors, Behaviors, Buttons and Effects.
Rename the duplicating things related to the ability to Adrenaline Boost, just to make it all a little more clear.
Making the buttons
Ability button
Button for your ability
Duplicate any button, and do the following things:
* Set ‘Name’ to ‘Adrenaline Boost’.
* Set ‘Tooltip’ to a descriptive text which explains what the ability does and what increases per level, e.g.: ‘Ling gets an energy shot and so has his movement and attack speed increased for 5 seconds.<n/><n/><c val="FFCC00"> Level 1 - 25% increase.<n/> Level 2 - 50% increase.<n/> Level 3 - 75% increase.<n/><n/>8 seconds cooldown.</c>’
* Set the icon to a fitting icon, I chose: ‘Assets/Textures/btn-upgrade-zerg-metabolicboost.dds’
* Setting a hotkey. I chose Q. (Yeah, QWERTY-keyboard. :o)
Hero tab button
This button will be the button to open the tab to the sheet where you can level your abilities, as in Warcraft 3.
Once again, duplicate any button, and do the following:
* Set a name, something like ‘Learning Tab’ or something.
* Set a tooltip. I have: ‘Opens the ability learn tab.’
* Set an icon that fits the button. I used the icon for the Unburrow ability of the Zerg, it suits him.
* Set a hotkey. I used R.
Cancel button
The button for returning to the normal command sheet.
Copy any cancel button and rename the tooltip to something useful, e.g.: ‘Returns to the normal command sheet.’
Alright, the buttons are done now.
Editing the effects of the ability
Alright, first we’ll work on the effects of the ability. Open the ‘Effects’ tab and search for the related effect. (If renamed: search for ‘Adrenaline’, else for ‘Stimpack Copy’.)
Duplicate this effect twice, including the Behaviors with it.
Remove the ‘Copy’ out of the name, and set for each effect and behavior a suffix (field: ‘Editor – Editor Suffix’) regarding the level of the ability. So something similar like [1] for the effect when the ability is at level 1, [2] for 2, etc.
Then go to the ‘Behavior’ tab. Find the behaviors related to the ability, and search for the field called ‘Combat – Modification – Attack Speed Multiplier’. For the level 1 behavior, set it to 1.25 (25% increase), for level 2 to 1.5 (50% increase) and for level 3 set it to 1.75 (75% increase).
Do the same as above for the field called ‘Movement – Modification – Movement Speed Multiplier’.
The field called ‘Stats – Duration’ is close under the ‘Movement’ fields, and must be set to 5 seconds, since that’s the time the effect will endure.
Then go to the field ‘UI – Icon’ and set it to the icon you also used for the buttons (‘Assets/Textures/btn-upgrade-zerg-metabolicboost.dds’).
Then double click the field below it (‘UI – Tooltip’) and set it to something that suits the ability. I set it to ‘This unit has an Adrenaline Boost; it moves and attacks faster.‘ Do this for every level of the ability.
The effects and name…
The behaviors and name…
(As you can see, this map has more custom units / effects / behaviors. :P)
Where to find the fields…
Editing the ability itself
You’re now done working on the effects and everything, let’s move on to the ability itself. Go to the ‘Ability’ tab, and go to your ability.
Go to the field ‘Effect – Effect’ and double click it. Right now, there should be either one of the following effects in the list:
1. Adrenaline Boost (Apply Buff) [1]
2. Adrenaline Boost (Apply Buff) [2]
3. Adrenaline Boost (Apply Buff) [3]
In order to make the ability have more than one level, we need to add more effects. In order to do this, press the little green ‘+X’, and find the other two effects. Arrange them in the level order, and you’re done at this field. There are a few more fields to change and add extra values to for the levels, which are:
* ’Cost – Cost – Cooldown – Time Use’: set it to the cooldown of the ability (8 seconds). Add two extra values for the levels.
* ’Cost – Cost – Cooldown – Location’: keep it at ability. Add two extra values for the levels.
* ’Cost – Cost – Cooldown – Link’: keep it at the current link. Add two extra values for the levels and set both to the link the original one has. If you have more abilities on your hero, make sure this field doesn’t overlap with each other (same values), because then the abilities will have a shared cooldown.
One final thing to do: remove the requirement in the field ‘Ability – Commands – Requirements’. Now, the ability itself is done, but now we need to do the leveling part, which is not too hard once you know how to do it.
’Effect – Effect’ settings…
Cooldown fields…
Settings…
The learning ability
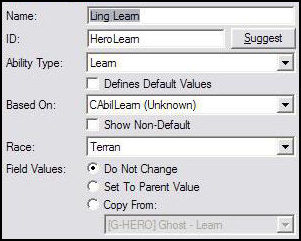
Alright, stick to the ‘Ability’ tab and add a new object. Set his name to something like ‘Ling Learn’ and use suggest ID. Set the ‘Ability Type’ to ‘Learn’ and set a race if you want. Hit OK.
Settings…
First, we’ll edit some of the basic things, such as the points you receive per level you gain. Go to the field ‘Ability – Points Per Level’ and set it to 1 if you want 1 point per level, 2 if you want 2 per level, etc. The field ‘Ability – Points’ sets the value of starting points, but as our hero already starts at level 1, it’ll already gain a point from the ‘Ability – Points Per Level’ field.
For any non-Warcraft 3 players: with each point, you can level one of your abilities once.
Optional:
Setting a sound for when you level an ability: go to the field ‘UI – Error Alert’, and set a sound to your liking. It’ll play when you level an ability.
Now, make sure the button ‘Combine Structure Values’ is pressed/checked!
THIS IS THE SPOT!!!!!
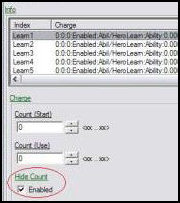
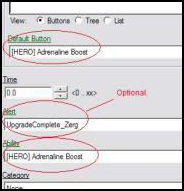
When that is done, double click the field ‘Ability – Info +’, and press on the value (at the top) which has the Index ‘Learn 1’. Now there are a few things to do in these fields, which are:
* Check ‘Hide Count’ so it’s Enabled. (Near the top.)
* Set ‘Default Button’ to the button you made for the ability. (Near the bottom.)
* Set ‘Ability’ to ‘Adrenaline Boost’. (Near the bottom.)
Alright, the learning ability is done – for now! If you want to add more abilities, use the other Indexes ‘Learn #’ to add them. (With a maximum of 20 abilties! Nice.)
The settings…
Adding the abilities to your unit
Back to the ‘Unit’ tab and select your hero.
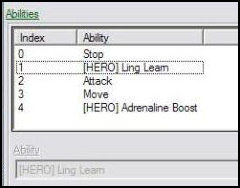
Double click the field ‘Ability – Abilities +’ and make sure the only abilities available are the abilities ‘Stop’, ‘Attack’ and ‘Move’. Now press our beloved, little green ‘+X’ and search for the learning ability (the ability we just worked on). Add it. Do the same for the ability that needs to be taught, so in my case: Adrenaline Boost. Hit OK, you’re done there.
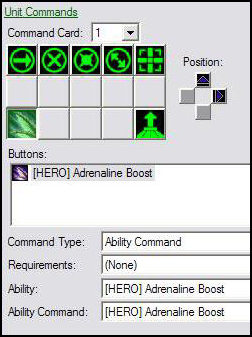
Next stop is the field ‘Ability – Command Card +’, double click it. There, remove all the buttons except the 5 buttons at the top row.
Then select the button position at the bottom row and at the first column. Press the little green ‘+X’ and choose the button you made for the ability itself. Hit OK. Set the ‘Command Type’ to ‘Ability Command’, keep ‘Requirements’ at none, set the ‘Ability’ to your ability and then the ‘Ability Command’ also to your ability.
Now, you’d think, you can already use the ability while you didn’t even level it! Q.Q, that ain’t no fun! But, no, that’s not what will happen, because the SC2 engine is smart, and detected your learning ability which contains the ability that will be taught, and will only show the ability once you have leveled it. So no worries.
Abilities field… (Should be anything like this.)
Settings of the button…
Now, as in Warcraft 3 the hero learning tab has an own tab, we’ll do the same here: select the button position at the bottom row, last column and press the little green ‘+X’. Pick the button you made to go from this tab to the hero learning tab (the ‘Hero tab button’ we made earlier). Now set its ‘Command Type’ to ‘Submenu’, keep ‘Requirements’ at none, set ‘Command Card’ to 2 (currently we’re working at sheet 1) and set ‘Learn Ability’ to our learning ability. This button is done now.
Settings of the button…
Now make your way to sheet 2. First of all, we need to make a button to return to our normal sheet. Once again, select the button position at the bottom row, last column and now pick your ‘Cancel’ button, and set the ‘Command Type’ to ‘Cancel Submenu’.
Next, we’ll add the button to make your hero actually learn the ability. Select the button position at the top row, first column and press that little green ‘+X’ and pick the button for your ability. Set the ‘Command Type’ to ‘Ability Command’, keep ‘Requirements’ at none, set ‘Ability’ to your learning ability and then set ‘Ability Command’ to the ability you want to learn with your button.
Settings of the buttons at card…
Congratulations! Your hero will now be able to learn an ability. If you want, feel free to test and do whatever you want with your hero.
But, while doing so, you’ll find out that when you’re at level 1, you can level your ability, which is good. But when you hit level 2, you can level it again! And that isn’t good, because it shouldn’t be able to level until you hit level 3. So what’s the problem? Indeed, requirements, which we’ll add now. What you also might’ve noticed, is that the ability button to learn the ability won’t go away once the ability reached the maximum level.
The requirement
Making it
Go to the ‘Requirements’ tab and add a completely new requirement, and then name it a proper way.
(NOTE: for each ability you’ll want to learn, you need to make AT LEAST ONE requirement, but once you know it, it isn’t really hard.)
Yeah, not really needed, but hell.
Adding it to your ability
There are two ways to do this: add the requirement at the Command Sheet and then at the learning button for the ability (less preferred to me), or by adding it at the learning ability in the learning tab (preferred by me). We’ll do it by my preferred way. (Also the way in which it will bug out less easily. :o )
Go back to your learning ability, and go to the field ‘Ability – Info +’, and select the value with Index ‘Learn 1’. There, find the requirement field, and then find your requirement (use search if needed). Add it. You’re done here now.
However, the requirement doesn’t do anything yet, so we’ll have to modify it.
The place!
Modifying the requirement
Now back to your requirement.
Double click the field ‘Requirement +’, and at first sight, you’ll think something like ‘what the bloody..!’, but don’t worry, it really isn’t that hard. I’ll guide you guys through this one.
First, we’ll make the button disappear once the ability reaches level 3. (Or, the maximum level.) The way we’ll do this, is making a ‘condition’ to it: if the ability level of the ability you want to learn less than the maximum level, show it, else hide it.
Right click on the folder ‘Show’ and click ‘Add Requirement Node’. An ‘And’ will now appear, which is a node. Press this node and change its ‘Type’ to ‘Less than’. Then right click that node and add two more requirement nodes.
Change the first added node ‘Type’ into ‘Count Ability’. Some more fields will appear. Set ‘Alias’ to your ability you want to learn and ‘State’ to ‘Completed at Unit’, so this requirement only works on this single unit, so to say.
Then to the second added node. Change ‘Type’ into ‘Constant’, and set its ‘Value’ to 3.
Now, the button will disappear when it will reach it maximum level, which is 3. If you want, test it.
This is how it should look like…
’”Expression code.”’
If it doesn’t work out for you by using these nodes, set the tab to ‘Expression’, and add this line of code:
Code:
CountAbil(StimPack2,CompleteOnlyAtUnit) < 3
Once that is done, go back to the ‘Tree’ tab, and make sure the ‘Alias’ is set to the right ability. Woosh, done.
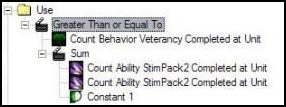
So now to the ‘Use’ folder. The button may only be pressed once the level of the hero is equal to or greater than ((Ability level * 2) + 1) [do the maths, it’s this way: level 0 -> level 1: hero should be at level 1; level 1 -> level 2: hero should be at level 3, etc.].
Add a new node, and set his type to ‘Greater Than or Equal To’. Add two new nodes to this field.
The first node’s ‘Type’ will be set to ‘Count Behavior’, the ‘Alias’ to your VETERANCY behavior and the ‘State’ to ‘Completed at Unit’.
The second node must be set to ‘Sum’. Then add THREE new nodes to that field.
Both the FIRST and the SECOND node must be set to the following: ‘Type’ to ‘Count Ability’, ‘Alias’ to the ability you want to learn and ‘State’ to ‘Completed at Unit’. Since there is no multiply in this, you’ll just need to add it twice, which are the first and second node.
The THIRD node must be set to ‘Constant’, and its value to ‘1’.
Now there’s one more thing to do, and that is enter what the requirement will say when it’s not reached. (E.g.: you don’t have a Tech Lab on your Barracks, but you want to train a Marauder, and the button says: Tech Lab required! Muahahahah!)
So, press the ‘Greater Than or Equal To’ node and select the ‘tooltip’ field. Anything you enter in here, will be the ‘warning’ (Tech Lab required!), I entered ‘Hero at corresponding level’.
NOTE: you can’t enter values for each level of the ability, so it won’t be like in WC3. That’s why I chose for my sentence.
This is how it should look like…
’”Expression code.”
Once again, it doesn’t work out? Go to the ‘Expression’ tab and this line of code:
Code:
CountBehavior(Veterancy,CompleteOnlyAtUnit) >= {Hero at corresponding level}(CountAbil(StimPack2,CompleteOnlyAtUnit) + CountAbil(StimPack2,CompleteOnlyAtUnit) + 1)
Again, make sure the ‘Alias’ of the first two nodes are set to the ability you want to learn.
Now, you’re done! The ability should level properly now and disappear when it reaches the maximum level. Happy me, happy you. It’s wonderful and actually so easy once you understand how it works.
Yeah, still no agility attribute… I’m just too… lazy do to it right now. Besides, aren’t you happy you already have a working hero?! Pfff.
Interesting stuff about the tutorial.
- 12 pages worth of text in Microsoft Word.
- Currently 4642 words. This includes these words and any code lines.
- OVER 9000 IMAGES!!!!! Just a joke. But it comes close to 50 soon, I bet. (45, Actually.)
The attached map is the full tutorial so far. Place the map in 'My Documents/Starcraft II Beta/Maps' to be able to open it with the editor.
Example map: (link)