Marine Protoss Shield Upgrades
| Author: Prancer (sc2mapster.com) | Tags: beginner data upgrade unit | |
| Source: http://forums.sc2mapster.com/resour... | Added 15 years ago |
Race Confusion
The Protoss get to have all the fun with their fancy shields and whatnot. It's time we give the Marines some fancy energy shields too. Not only just give them shields, but have the Protoss Shield Upgrades affect the Marines too.
A Shielded Marine is a Happy Marine
First, open the Data Editor and selected the Units datatype. We're going to just alter the existing Marine for this tutorial. Shield stats are handled within the Marine unit. So, use the search bar and select the Marine unit. The "Shield Armor" is the armor value of the shield itself, and this is the value that is increased for every Protoss Shield Upgrade.
It reduces incoming damage while the shield is active. Leave the "Stats - Shield Armor Level" alone, this is simply a numeric representation of the shield level, it will not effect the unit, but it will be increased for every Protoss Shield Upgrade.
Change the Stats - Shield Maximum and Stats - Shield Starting Amount to 40. Set the Stats - Shield Regeneration Rate to 2. Shield Maximum is, obviously, the maximum shield level. The Shield Starting Amount is the amount of shield the unit has when it is created.
We are setting it to the maximum because we want the unit to have full shields at spawn. The regeneration rate is the speed at which the shield will recharge.
Edit the Combat - Shield Armor Name and set the Text Key to "Unit/ShieldArmorName/TerranInfantryShields" (without quotes) and change the text to "Terran Plasma Shield". This is the text that will show up when the player hovers over the shield icon in the unit's information panel.
Although it's not necessary, we set a "Text Key" so that we can use this same string for other units if we choose to add shields to other Terran units. This way we don't have to manually enter the "Terran Plasma Shield" for every single unit, we can just refer to it via the key "Unit/ShieldArmorName/TerranInfantryShields".
Also, this key is now available in the Text Module so, if you change the value from there, the changes will be reflected across all units that refer to this Text Key. Now that's a handy tool. Also, the text editor allows you to change the color and style of the string itself.
This is enough to give our boys some shielding, complete with a nice little shield effect when hit. But we still have to make the Protoss Shield Upgrades affect the Marine. We'll do that now.
An Olive Branch
Instead of having the Terrans develop their own shielding system, the Protoss are going to be kind enough to extend their shielding upgrades to affect Marines. This will keep things simple for this tutorial. If you wish to create a whole Terran line of shielding, you should be able to figure it out after following this tutorial.
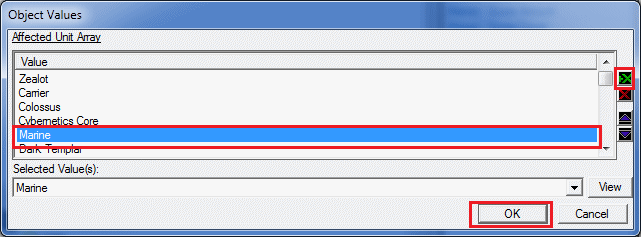
Back in the Data Editor Set the Data Type to Upgrades. Find (using the search bar) Protoss Shields Level 1. With it selected, edit the (NONE) - Affected Unit Array field. In the popup, click the green X button and in the popup select Marine and click OK. Click OK again to close the field menu.
It is important to note that this is not enough to make the upgrade affect the Marine. We must specify how the upgrade will affect the Marine unit. To do this, click the (None) - Effects + field to edit it. Admittedly this menu is not as intuitive as the other list menus, but the trick is to right click and choose Add Effect.
This will add a blank effect to the list. With this blank effect selected, change the Type to Unit. Now, change the Object to Marine. The Field tree below will populate with all of the settings you can modify or the unity. This is another place for lots of customization potential.
You can have upgrades that change the unit's speed, or even it's name. But for us, we're going to copy what the good folks at Blizzard did and select the Shield Armor field. With that field selected change the Operation to Add and change the Value to 1. This means the unit's armor is increased by 1 when this upgrade is trained.

Right click again and select Add Effect. Again, change the Type to Unit and the Object to Marine. This time, though, select the Shield Armor Level from the Field tree. Change the Operation to Add and set the Value to 1. This increase the Shield Armor Level. Although this value does not affect the unit's actual shield armor, it is a nice numerical representation of the current upgrade level of the shield.
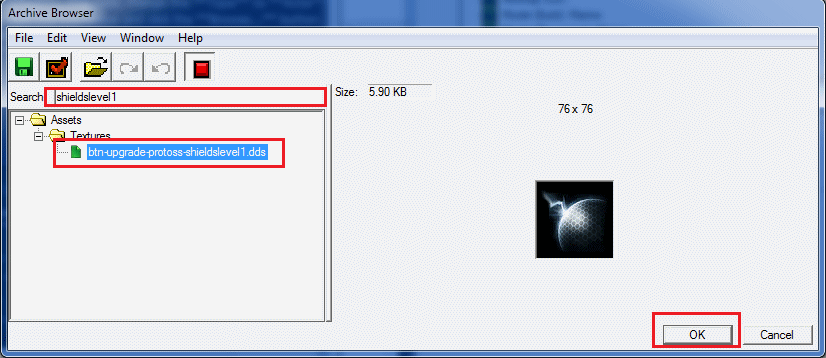
We now have one more effect to add. Right click again and select Add Effect. This type, change the Type to Actor. Change the Object to Marine. Select the Shield Armor Icon field from the tree below and click the Browse... button. This will bring up the texture browser. In the Search box type in shieldslevel1.
Select the only texture that appears and click OK. Note: you may select whatever texture you would like. This is the texture that appears in the selected unit's info panel for the shield level. So, as you can see, Upgrades are able to even change visual data, such as an icon.
To save time, I won't detail out changing other two upgrade levels, but it's exactly the same. So, repeat the previous process for the Protoss Shields Level 2 and Protoss Shields Level 3 upgrades as well. Just look at the data that is already in there to see what you need to change for your marine.
They all do the same thing (Add 1 to Shield Armor, Add 1 to Shield Armor Level) but they each reference a different shield texture for the actor.
If all was done correctly, any shield upgrades purchased through the Forge should now upgrade the Marine as well! Let's test it, but before we do, let's make the research fast and free so we don't have to sit around all day waiting for it to finish.
Testing It Out
Upgrade research is actually considered an ability. Since the Forge is where the Protoss Shield Upgrades are purchased, Blizzard dutifully named the research ability "Forge - Research (Forge)". So, set the Data Type in the Data Editor to Abilities and find (using Search) Forge - Research (Forge) ability.
With the research ability selected, edit the (None) Info + field. This brings up a list of buttons and their corresponding upgrades. Hidden inside is also the cost of each upgrade. To change this right click on the Protoss Shields Level 1 and select Modify Command... Scroll down in the new menu until you find the heading Resource.
This list shows the cost for this particular upgrade. Select the Minerals item and change the Selected Value to 0. Do the same for the Vespene.

Scroll further down in this menu until you find the Time field. Change this value to 1. This is the build time for this upgrade.
Click OK to save your changes.
Repeat this process for the other 2 upgrade levels
You should now be able to place some marines on your map, add a Forge (with a pylon!) and a Twilight Council (needed for level 2 and 3 upgrades) and purchase your shield upgrades. Take note of the marine's Shield Armor level as you buy the upgrades.
Removing Research Requirements (Optional)
Annoyingly, the level 2 and 3 shield upgrades require a Twilight Council to be built. If you would like to remove this requirement, follow along.
Looking back at the Forge - Research (Forge) ability and the (None) Info + field therein, we were able to change the cost of the research using the Modify Command... menu. In this menu there was a list called Requirement that sets, obviously, a requirement for researching this upgrade.
These requirements are defined in the Data Editor as well. This menu showed us that Protoss Shield Level 2 upgrade required the Learn Protoss Shield2 requirement. So, let's investigate.
Set the Data Editor's Data Type to Requirements. Search for Learn Protoss Shield2. With this element selected, you'll notice an enticing field called Requirement +. Indeed, edit that field.
In the menu that pops up we're presented with a tree that shows the various requirement nodes for this requirement. You'll notice that it's divided into Use and Show. These are fairly clear on their meaning: "Use" requirements are those that are required to be fulfilled before the player can use the upgrade (that is, research it).
The "Show" requirements are those that are necessary before the option to upgrade will appear in the Forge's ability panel. Obviously we are going to remove the "Count Unit TwilightCouncil Completed" node. So, right click the Count Unit TwilightCouncil Completed node and select Remove Requirement Node.
Poof, no longer do we need a Twilight Council to upgrade to level 2. Repeat this for level 3.
You should now be able to train all three levels at a Forge without a Twilight Council.
The Protoss get to have all the fun with their fancy shields and whatnot. It's time we give the Marines some fancy energy shields too. Not only just give them shields, but have the Protoss Shield Upgrades affect the Marines too.
A Shielded Marine is a Happy Marine
First, open the Data Editor and selected the Units datatype. We're going to just alter the existing Marine for this tutorial. Shield stats are handled within the Marine unit. So, use the search bar and select the Marine unit. The "Shield Armor" is the armor value of the shield itself, and this is the value that is increased for every Protoss Shield Upgrade.
It reduces incoming damage while the shield is active. Leave the "Stats - Shield Armor Level" alone, this is simply a numeric representation of the shield level, it will not effect the unit, but it will be increased for every Protoss Shield Upgrade.
Change the Stats - Shield Maximum and Stats - Shield Starting Amount to 40. Set the Stats - Shield Regeneration Rate to 2. Shield Maximum is, obviously, the maximum shield level. The Shield Starting Amount is the amount of shield the unit has when it is created.
We are setting it to the maximum because we want the unit to have full shields at spawn. The regeneration rate is the speed at which the shield will recharge.
Edit the Combat - Shield Armor Name and set the Text Key to "Unit/ShieldArmorName/TerranInfantryShields" (without quotes) and change the text to "Terran Plasma Shield". This is the text that will show up when the player hovers over the shield icon in the unit's information panel.
Although it's not necessary, we set a "Text Key" so that we can use this same string for other units if we choose to add shields to other Terran units. This way we don't have to manually enter the "Terran Plasma Shield" for every single unit, we can just refer to it via the key "Unit/ShieldArmorName/TerranInfantryShields".
Also, this key is now available in the Text Module so, if you change the value from there, the changes will be reflected across all units that refer to this Text Key. Now that's a handy tool. Also, the text editor allows you to change the color and style of the string itself.
This is enough to give our boys some shielding, complete with a nice little shield effect when hit. But we still have to make the Protoss Shield Upgrades affect the Marine. We'll do that now.
An Olive Branch
Instead of having the Terrans develop their own shielding system, the Protoss are going to be kind enough to extend their shielding upgrades to affect Marines. This will keep things simple for this tutorial. If you wish to create a whole Terran line of shielding, you should be able to figure it out after following this tutorial.
Back in the Data Editor Set the Data Type to Upgrades. Find (using the search bar) Protoss Shields Level 1. With it selected, edit the (NONE) - Affected Unit Array field. In the popup, click the green X button and in the popup select Marine and click OK. Click OK again to close the field menu.
It is important to note that this is not enough to make the upgrade affect the Marine. We must specify how the upgrade will affect the Marine unit. To do this, click the (None) - Effects + field to edit it. Admittedly this menu is not as intuitive as the other list menus, but the trick is to right click and choose Add Effect.
This will add a blank effect to the list. With this blank effect selected, change the Type to Unit. Now, change the Object to Marine. The Field tree below will populate with all of the settings you can modify or the unity. This is another place for lots of customization potential.
You can have upgrades that change the unit's speed, or even it's name. But for us, we're going to copy what the good folks at Blizzard did and select the Shield Armor field. With that field selected change the Operation to Add and change the Value to 1. This means the unit's armor is increased by 1 when this upgrade is trained.
Right click again and select Add Effect. Again, change the Type to Unit and the Object to Marine. This time, though, select the Shield Armor Level from the Field tree. Change the Operation to Add and set the Value to 1. This increase the Shield Armor Level. Although this value does not affect the unit's actual shield armor, it is a nice numerical representation of the current upgrade level of the shield.
We now have one more effect to add. Right click again and select Add Effect. This type, change the Type to Actor. Change the Object to Marine. Select the Shield Armor Icon field from the tree below and click the Browse... button. This will bring up the texture browser. In the Search box type in shieldslevel1.
Select the only texture that appears and click OK. Note: you may select whatever texture you would like. This is the texture that appears in the selected unit's info panel for the shield level. So, as you can see, Upgrades are able to even change visual data, such as an icon.
To save time, I won't detail out changing other two upgrade levels, but it's exactly the same. So, repeat the previous process for the Protoss Shields Level 2 and Protoss Shields Level 3 upgrades as well. Just look at the data that is already in there to see what you need to change for your marine.
They all do the same thing (Add 1 to Shield Armor, Add 1 to Shield Armor Level) but they each reference a different shield texture for the actor.
If all was done correctly, any shield upgrades purchased through the Forge should now upgrade the Marine as well! Let's test it, but before we do, let's make the research fast and free so we don't have to sit around all day waiting for it to finish.
Testing It Out
Upgrade research is actually considered an ability. Since the Forge is where the Protoss Shield Upgrades are purchased, Blizzard dutifully named the research ability "Forge - Research (Forge)". So, set the Data Type in the Data Editor to Abilities and find (using Search) Forge - Research (Forge) ability.
With the research ability selected, edit the (None) Info + field. This brings up a list of buttons and their corresponding upgrades. Hidden inside is also the cost of each upgrade. To change this right click on the Protoss Shields Level 1 and select Modify Command... Scroll down in the new menu until you find the heading Resource.
This list shows the cost for this particular upgrade. Select the Minerals item and change the Selected Value to 0. Do the same for the Vespene.
Scroll further down in this menu until you find the Time field. Change this value to 1. This is the build time for this upgrade.
Click OK to save your changes.
Repeat this process for the other 2 upgrade levels
You should now be able to place some marines on your map, add a Forge (with a pylon!) and a Twilight Council (needed for level 2 and 3 upgrades) and purchase your shield upgrades. Take note of the marine's Shield Armor level as you buy the upgrades.
Removing Research Requirements (Optional)
Annoyingly, the level 2 and 3 shield upgrades require a Twilight Council to be built. If you would like to remove this requirement, follow along.
Looking back at the Forge - Research (Forge) ability and the (None) Info + field therein, we were able to change the cost of the research using the Modify Command... menu. In this menu there was a list called Requirement that sets, obviously, a requirement for researching this upgrade.
These requirements are defined in the Data Editor as well. This menu showed us that Protoss Shield Level 2 upgrade required the Learn Protoss Shield2 requirement. So, let's investigate.
Set the Data Editor's Data Type to Requirements. Search for Learn Protoss Shield2. With this element selected, you'll notice an enticing field called Requirement +. Indeed, edit that field.
In the menu that pops up we're presented with a tree that shows the various requirement nodes for this requirement. You'll notice that it's divided into Use and Show. These are fairly clear on their meaning: "Use" requirements are those that are required to be fulfilled before the player can use the upgrade (that is, research it).
The "Show" requirements are those that are necessary before the option to upgrade will appear in the Forge's ability panel. Obviously we are going to remove the "Count Unit TwilightCouncil Completed" node. So, right click the Count Unit TwilightCouncil Completed node and select Remove Requirement Node.
Poof, no longer do we need a Twilight Council to upgrade to level 2. Repeat this for level 3.
You should now be able to train all three levels at a Forge without a Twilight Council.