Terraining Tips
| Author: Payne (staredit.net) | Tags: beginner terrain | |
| Source: http://www.staredit.net/topic/11588... | Added 15 years ago |
We've seen a lot of tutorials around, but there really is only very few tutorials about how to terrain. So far, I've found these: #1 (2 parts), #2 (3 parts).
I am here proposing to all StarCraft II mappers to give out their little tips about Doodads Placement and General Terraining and share any knowledge they have about it. I'll make sure to update this thread and when I'll consider we have gathered up enough information, I'll make a Guide with it.
General terraining tips:
Bel'Shir (Jungle):
A little article that might help you out when creating waterfalls:
Quote from Waterfall designs:
When you look at waterfall designs, there are those that are absolutely beautiful and those that just don't quite make it. So, how do you create a spectacular one?
The key is to make it look as natural looking as possible. Observing those found in nature will allow you to see how those created in home landscapes should look.
Although you will see some water features where the water flows gently over rocks, many have very dramatic waterfall spillways. A waterfall spillway often is created by a large flat rock, which is built up beneath it by smaller round stones. Picture a step with an overhang. The higher up the flat stone is from the level beneath it, the higher the waterfall.
These flat stones might be pieces of bluestone. They also might be thick slabs of fieldstone. There is no reason why you can't mix them as this might occur in our natural environment also. Another aspect of waterfalls in nature is that they generally will have more than one spillway.
The sides of the waterfalls are often made of different sized stones. Larger ones are mixed in with medium, small and even pebble sized rocks.
Plants are usually incorporated into waterfall designs. In the woods, soil deposits in and near the falls would have created pockets for plant seeds to lodge. Plants that are suited to the specific conditions of the area will grow well. If the waterfall is in a damp, shady area, you might find such plants as ferns. If the area happens to be sunny, those plants that like the sun will survive. Plants that are indigenous to the area will be part of the landscape as that is where they grow best.
All of these ideas can be used for various types of waterfalls. One thing that is good to remember is that all waterfall designs look best when it appears that water is tumbling down from a higher elevation. You don't want an unnatural mound sitting there. This is true whether you are creating a waterfall for a swimming pool, pond or stream.
If you are lucky enough to have property that slopes down towards the area you are going to be viewing the waterfall from, you will have the best type of water feature. Sometimes you can tweak your viewpoint to take advantage of this. For example, if your land slopes towards your house, you will be able to see the waterfall clearly from your home. However, if your land slopes towards the rear yard, this is not so. In this case, you might want to add a special sitting area in which you can view the waterfall from.
There are many different stone types and colors. Some are fieldstone, found in the woods. Others come from mines. I mentioned above mixing different kinds of flat stones. Mixing stone types or colors can be done, although the majority should be similar. If you think about mountains and geology, similar stones collect in certain areas. Sizes, however, should definitely be mixed.
These are things that you can mimic when creating your own waterfall. Try to create your waterfall as you might see it in the woods or mountains. It will be more successful this way.
I also wanted to make a separated section for this because it is the kind of features that could be useful, even when not prettying up your terrain:
Copying terrain, doodads or units:
Mirroring your selection:
This trick is very useful for melee mapping since it allows you to create perfect inverted terrain. :D
Finally, I'd like to thank every member that helped me. This include SENers just like Mapsters.
Talking of Mapster: a guy wrote a tutorial, partially for this thread.
Here it is. Make sure you read it, it is very useful!
Thanks to Mozared! :)
See also:
Terraining for Dummies
I am here proposing to all StarCraft II mappers to give out their little tips about Doodads Placement and General Terraining and share any knowledge they have about it. I'll make sure to update this thread and when I'll consider we have gathered up enough information, I'll make a Guide with it.
General terraining tips:
- Annoyed by the "placement grid" of doodads? Press "Shift" when you are placing them, it'll enable the "Ignore Placement Requirements" option.
- Instead of placing the current doodad randomly suggested by the editor, deleting it and repeating until you get the doodad you want, you can search through the variations of the same doodad by pressing "." or ",".
- You can place doodads on the lowest cliff level (which normally doesn't allow you to set anything but terrain textures or water) with the "Ignore Placement Requirements" option checked. (Works also for Units!)
- Pressing "Ctrl" while placing a doodad disables the "Ignore Placement Requirements" option (which means it follows the "placement grid").
- Pressing "Ctrl" and left-clicking anywhere makes a selected doodad face into the direction of the click.
- Avoid as much as possible linear placement (for units, doodads, cliffs, etc.): it -never- looks natural.
- Having "Level 2" cliffs (highest) is a good opportunity to set very few little patches of "Level 1" cliffs around it and set some vines (Image).
- Using 'Giant Rock', 'Tarsonis Building' or 'Metal Wall' requires you to place 'Pathing Blockers' manually around them because Blizzard haven't managed to make them interact with the environment: they are simply images. (Or you can simply use the 'Pathing' layer, which allows you to block paths much easier and precisely.)
- 'No-fly zones' are also available in the editor.
- You can also pretty-up your water by placing fishes. A waterfall is always great too, but not too many (Image)!
- Try to draw players' eyes to important terrain features such as ramps, choke points, or whatever might be important in the map that you're creating.
- Ramps, especially in the range of North-West/North-East, are very difficult to spot in-game if not properly outlined with a lighter texture than the surroundings, especially on darker tilesets like 'Char (Volcanic)' (Image).
- Waterfalls can be hard to place manually. It's better to set them near the location you want them and then to edit their properties' value such as Height, Scale and Position afterward.
- If you're a detail-freak, you might want to remember that the trees like to be facing the sun. Use the "Ctrl" trick (it rotates the doodads) to set that forest up! Do not forget the trees have different sizes too.
- Use 'Omni Lights' to make color shadings such as back light. (Very nice to light up places at night, like fireflies forest.)
- "PgUp" and "PgDn" changes the height of an already-placed doodad.
- "+" and "-", on the numpad, changes the size of an already-placed doodad.
- Numbers of the numpad allows you to move the selected doodads (or units) in any direction.
- To see the light-doodads, you must have your Game Settings on High.
- Here is a list of all the doodads that create lights: Floodlight(s), Landing Lights, Omni Lights, Caution Lights, Blimps, Space Platform Sign, Wall Lights and Streetlights.
- Trees on the sides of roads are normally placed very linearly and are either made of a single row or consists into a very dense forest.
- To turn units into doodads: take a doodad in the Data editor, copy it and rename the copy. Change the copy's model's variation count to 1, and scale it to whatever you wish. Change the model to a unit of your desire, and you have that unit as a doodad. This allows you to modify the size, position (including Z-axis!) and orientation of the unit from inside the editor.
- Adding blue/cyan to crystals can really create a nice "glitter" effect.
- Cliffs and rivers/creeks/tributaries are the best way to make a player go through a certain path. Therefore, you should start with these before going deeper into your terraining.
- You can use lowered 'Curtain Korhal' and 'Space Platform Steam Vents' doodads to obtain 'smoke effects' (Image).
- Reducing the size of palm trees (Tree - Bel'Shir) and lowering their height creates good ferns (Image).
- Adjust the flow-direction of your water: you don't want rivers to flow upstream, into your waterfalls.
- Trees usually grow in groups (either large or small). A lonely tree isn't really natural.
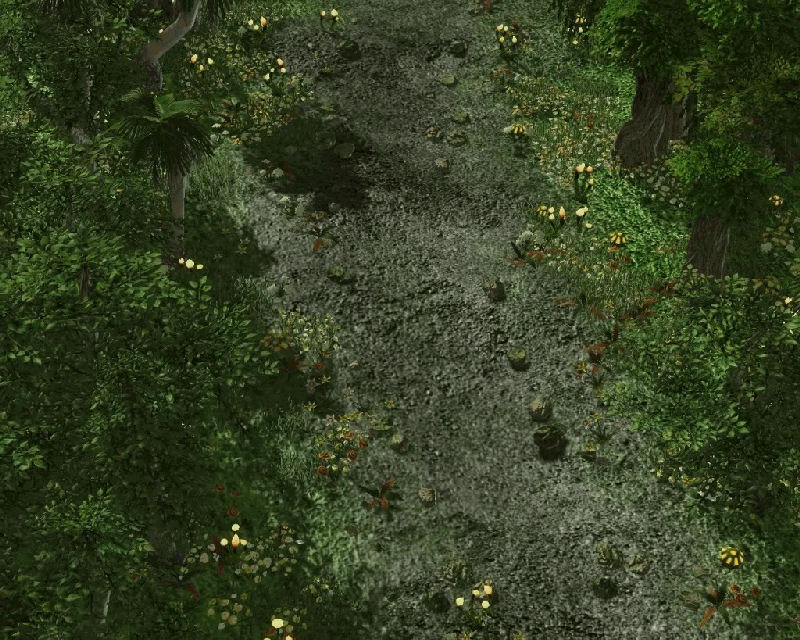
- Placing trees nearer to water always looks more natural (Image).
- Make a doodad (make an actor for a doodad, and then make a model for the doodad) and change the model to the portrait of anything (Mule, for example). If you position them right, you can hide the ugly backgrounds and get high quality models (Image).
Bel'Shir (Jungle):
- Small 'Light Dirt' patches goes well under palm trees (Image).
- If the main terrain is in 'Light Grass', it looks good to set a very little touch of 'Brush' all around the edges (Image).
- Having a base set somewhere usually means that the units have walked a lot in this area. If your base is made of 'Light Grass', you might want to put some 'Dark Dirt' or 'Brush' in there to make it look more natural (Image).
- 'Tree - Mar Sara' goes very well on 'Dirt' brushes (Light/Dark) (Image).
A little article that might help you out when creating waterfalls:
Quote from Waterfall designs:
When you look at waterfall designs, there are those that are absolutely beautiful and those that just don't quite make it. So, how do you create a spectacular one?
The key is to make it look as natural looking as possible. Observing those found in nature will allow you to see how those created in home landscapes should look.
Although you will see some water features where the water flows gently over rocks, many have very dramatic waterfall spillways. A waterfall spillway often is created by a large flat rock, which is built up beneath it by smaller round stones. Picture a step with an overhang. The higher up the flat stone is from the level beneath it, the higher the waterfall.
These flat stones might be pieces of bluestone. They also might be thick slabs of fieldstone. There is no reason why you can't mix them as this might occur in our natural environment also. Another aspect of waterfalls in nature is that they generally will have more than one spillway.
The sides of the waterfalls are often made of different sized stones. Larger ones are mixed in with medium, small and even pebble sized rocks.
Plants are usually incorporated into waterfall designs. In the woods, soil deposits in and near the falls would have created pockets for plant seeds to lodge. Plants that are suited to the specific conditions of the area will grow well. If the waterfall is in a damp, shady area, you might find such plants as ferns. If the area happens to be sunny, those plants that like the sun will survive. Plants that are indigenous to the area will be part of the landscape as that is where they grow best.
All of these ideas can be used for various types of waterfalls. One thing that is good to remember is that all waterfall designs look best when it appears that water is tumbling down from a higher elevation. You don't want an unnatural mound sitting there. This is true whether you are creating a waterfall for a swimming pool, pond or stream.
If you are lucky enough to have property that slopes down towards the area you are going to be viewing the waterfall from, you will have the best type of water feature. Sometimes you can tweak your viewpoint to take advantage of this. For example, if your land slopes towards your house, you will be able to see the waterfall clearly from your home. However, if your land slopes towards the rear yard, this is not so. In this case, you might want to add a special sitting area in which you can view the waterfall from.
There are many different stone types and colors. Some are fieldstone, found in the woods. Others come from mines. I mentioned above mixing different kinds of flat stones. Mixing stone types or colors can be done, although the majority should be similar. If you think about mountains and geology, similar stones collect in certain areas. Sizes, however, should definitely be mixed.
These are things that you can mimic when creating your own waterfall. Try to create your waterfall as you might see it in the woods or mountains. It will be more successful this way.
I also wanted to make a separated section for this because it is the kind of features that could be useful, even when not prettying up your terrain:
Copying terrain, doodads or units:
- Turn on 'Selection Mode' (hit 'Space')
- Highlight what you want to mirror or copy
- In the case of the terrain, it helps to activate the 'Snap to grid' option. Also, for Terrain layer, it might be useful to know that the selection done isn't shown on the screen.
- Ctrl + C to Copy
- Ctrl + V to Paste
Mirroring your selection:
- Alt + . to flip Horizontally
- Alt + , to flip Vertically
- You can "stack" the mirrors (Alt + , + .) to obtain the diagonal flip!
This trick is very useful for melee mapping since it allows you to create perfect inverted terrain. :D
Finally, I'd like to thank every member that helped me. This include SENers just like Mapsters.
Talking of Mapster: a guy wrote a tutorial, partially for this thread.
Here it is. Make sure you read it, it is very useful!
Thanks to Mozared! :)
See also:
Terraining for Dummies