Lobby and Game Mode Guide
| Author: uBdead (sc2mapster.com) | Tags: beginner settings lobby | |
| Source: http://forums.sc2mapster.com/resour... | Added 15 years ago |
Intro
This long guide will try to help you set up your lobby and serve as a reference for everything related to lobby and games modes. See chapter "Reference" for useful pictures where your text ends up in-game.Sorry for the wall of text :).
Index
I don't know how to use anchors links on this site, so this is basically a list with everything that's in this tutorial (or planned).
1. Creating a ‘one mode’ map
2. Creating a map with multiple modes
3. Player attributes, picking your hero in the lobby
4. Lobby reference
Creating a ‘one mode’ map. (Foundation for every map, this should be applied to every map).
You want this kind of map if your players have nothing to choose, however every map should apply these settings at first.
1. Set up your general map information at Map > Properties. See the reference to see where the text shows up in the game.
2. First set up your players, and who’s controlling them at Map -> Player Properties. For this example i choose to use four players (and player 0 is always neutral). Don’t set up race/color or anything else in here. ONLY THE CONTROLLER.
3. Now open up Map -> Game Variants.
4. Click the [Add] button and right click the item in the list and select ‘Default’. Select the newly appeared item in the list.
5. Go to the General tab and give your Variant a new name (this is not displayed anywhere in-game). I used “Classic”.
6. Give it a nice description (look at the reference for appearances of this field in the game).
7. I’m not sure if the Icon field is used, you might want to post in this thread if you find out what it does.
8. Next go to the Game Type tab. This is a fairly important tab, consult the reference to see where the fields are displayed in-game.
9. Please note that the Category will have to describe what kind of game your map is. Is it a FPS, RTS, Hero Defence, Tower Defence, etc.
10. The mode will be how the game is played. Take DotA for example, you can play DotA on APEM, AREM, etc.. Since you are reading this topic you will want to name your mode something like ‘Default’ or ‘Classic’.
11. Go to the Attributes tab.
1. Now I’ll walk through all the different Attributes, if I skip an Attribute just don’t touch it and leave it to default. Also lock every field. And I mean all of them.
2. Game speed: put this Faster.
3. Lobby delay: I think ten seconds is perfect.
4. Locked Alliances: This is will keep players from making teams once in-game (or un-ally players).
5. Teams: Put this to Custom Teams.
6. Color: You can lock the color’s for the players here if you want to.
7. Race: If you need certain players to be a certain race, this is the place.
8. Team [Custom teams]: Here you can set up each player’s team. So if you want 1vs3 set player 1 to Team1[1] and players 2,3 and 4 to Team2[1]. You get the picture.
9. That’s it for now.
12. Click [OK] (if you hit [Cancel] you’re so fucked).
13. Note that, as soon as you change anything to Map > Player Properties, you will get a Custom mode without any way to hide it. So retards may still set it to custom and fuck up your game. I consider this automatic Custom Mode thing a bug and I hope Blizzard will fix it in the next patch.
14. That should be it for now! Try hosting your game with the settings and you’ll be sure the teams and such are in order.
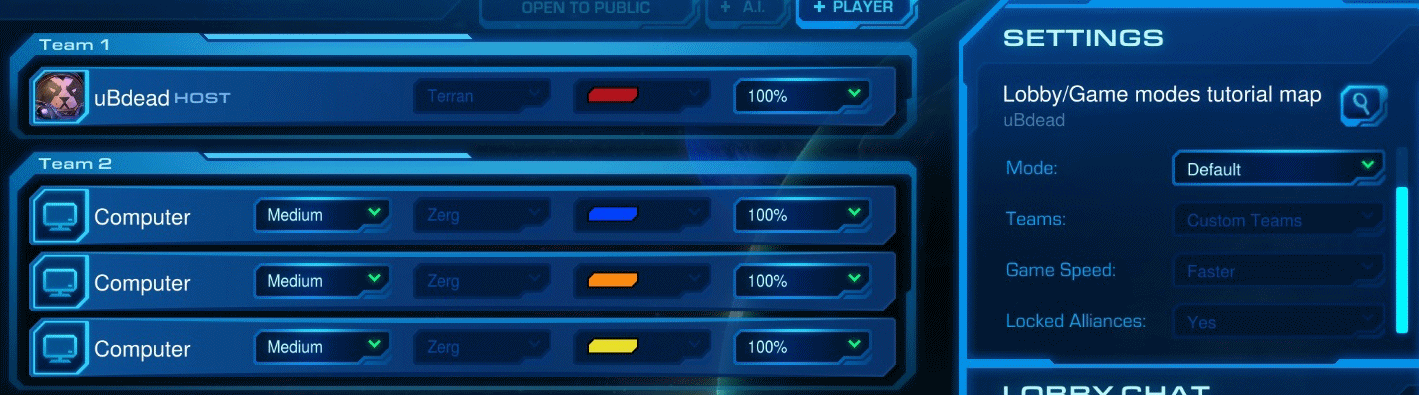
Result, note the locked color, team and such
Multiple game modes.
This chapter builds on the previous chapter, if you haven’t read it yet, please do so now.
1. Lets go to the Map > Game Variants window.
2. Duplicate your ‘Default’ mode by right clicking it in the Game Variants list and selecting ‘Duplicate’.
3. Now select the newly created Variant and go to the General tab.
4. For this example, I’m going to make a Deathmatch FFA mode, so I’m going to call mine “Deathmatch”.
5. Next up the “Game Type” tab. Don’t change anything in the Category fields. For the Mode fields I set the name to Deathmatch FFA (because my deathmatch won’t have teams, every man/alien/zerg for himself hehe).
6. Click the ‘Attributes’ tab. Ok because this is Deathmatch mode I’d like to give my players a little more options. I lock the (Game) Teams to Free For All. Clear the custom teams, and well change anything you’d like, most things should be self-explanatory.
7. Click [OK] to exit the Game Variants window. Open up Map > Game Attributes.
8. Ok, for reasons beyond my understanding, Blizzard has given us no way to get the used Game Mode in the trigger editor. No biggy, we can use a Game Attribute for this.
9. Click the [Add] button to create a new Attribute. Go to the General tab and make sure the “Game” selection is selected for Type.
10. For name fill in “Game Mode HACK”, don’t skip the HACK part or you’ll have trouble later (you can call it anything, but make sure you’ll recognize it later).
11. Go to the Values tab and create a new value for every game mode you have. For this example I have ‘Default’ and ‘Deathmatch’ as values.
12. Now go to the Usage tab. Here we are going to hide all the settings from the players because it should all be done automatically:
1. Availability: Always
2. Visibility: None
3. Access: None
4. Options: [ ] Locked when public [x] Hidden
13. Click [OK] to wrap it up and go back to Game Variants (Map > Game Variants). Select Deathmatch from the Variants list.
14. Go to the Attributes tab, you might have noticed already, there is now a new Attribute in the list: (Game) Game Mode HACK, click on it.
15. Now for (All Players) select the appropriate game mode, so Deathmatch gets Deathmatch, etc..
16. Repeat these steps to set the Game Mode HACK for Default game variant to Default.
17. Open up the trigger editor and create a new trigger called ‘gamemode’.
18. Now I’m getting pretty lazy, so I’m going to make a picture and elaborate on it:
The gamemode trigger
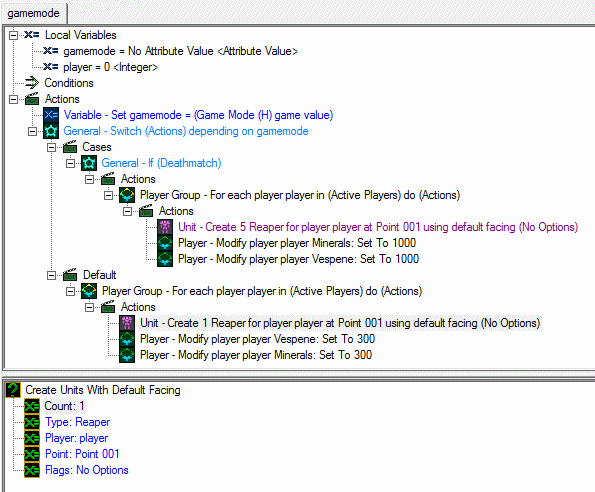
1. (to be continued).
Player attributes, picking your hero in the lobby
Please download at look at the attached map when reading this.
Because most of the players know DotA, I like to use it as an example. Now as you are aware, players pick a hero at the start of the game. Why not let our players pick their hero in lobby? Obviously you are not limited to picking a hero, you could give a player all sorts of choices.
1. Go to Map > Game Attributes and click the [Add] button. Select the new item in the list.
2. Go to the General tab select Player for the type.
3. Fill out the name and description field.
4. Go to the Values tab. These are the options your players can choose from, I made some silly heroes (Action Hank, Bahama Man, Monkeylord) for this example.
5. Next up let’s make sure we set some default warnings or Blizzard will yell at us for not doing so.
6. Just randomly assign them, OR, if actually want player 1 too always play Action Hank, put in the Action Hank value and check the [Locked] box.
7. Note that you can have more than one Player Attribute, but it will look shitty in the lobby as the layout gets messed up. So I’d recommend against that.
8. Ok next up using this information in the game.
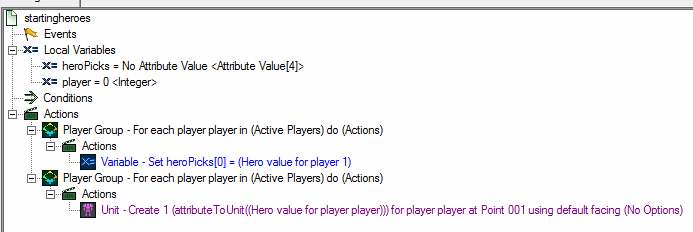
9. Open up the trigger editor and create a new trigger. I called mine startingHeroes for the example.
10. First thing you don’t want to forget is that the trigger needs to be triggered when the map initializes, add an Run Trigger action to your initiation trigger that will trigger your trigger (if I say trigger one more time ill pull the trigger on myself).
11. So the next part is fairly dynamic if you didn’t follow the tutorial example, but it should be clear to you how to apply this to your own map.
12. We start the new trigger with reading the chosen heroes into an array. Create a global variable of the type Attribute Value, check the Array box. Set the Size of the array to the maximum amount of players your map will have. I called my var heroPicks.
13. We need a loop that goes through all the active players. Add a new variable called “player” to the local variables. Next add this action “Player Group - For each player player in (Active Players) do (Actions)” (a basic loop through all the players loop).
14. Add an Set Variable action inside the loop. Parameters:
1. Variable: heroPicks
1. Index player (the local var)
2. Value: Attribute Player Value (a function)
1. Attribute: Hero (or whatever you called your player attribute)
2. Player: player (the local var)
15. Great now we have an array with the hero’s the players picked.
16. So now we need to translate the picked hero’s to an actual in-game unit. Let’s create a function for this.
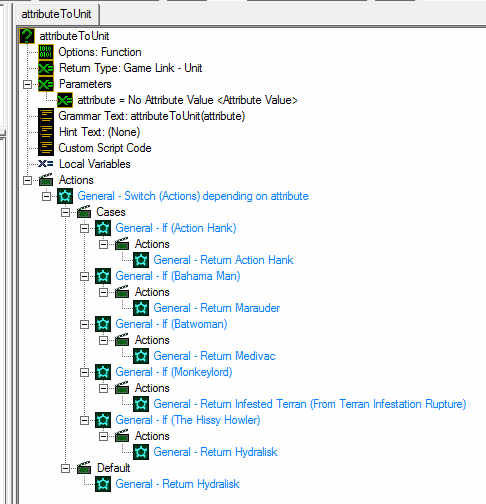
17. Right click the left pane and select New > Function and give it a suitable name, I called mine attributeToUnit.
18. Set the return type to “Unit Type”.
19. Create a new parameter (right click parameter and select New > Parameter or press CTRL+M). Call it attribute, type is Attribute Value.
20. Create a new Switch action and set the Value to the Parameter ‘attribute’.
21. Add the as many cases to the Switch as the amount of attribute options you have.
22. Now for each General – If (case) set the value to your attribute -> option. So using my example I set the first case to Value:
1. attribute: Hero
2. value: Action Hank.
23. Now for each Case return the correct unit type. Do this by adding a Return action to each case. For the Value enter the unit type you want the Hero you want it to correspond with. For example I returned the Marine for the hero Action Hank.
24. For the Default case return any unit type, this shouldn’t ever happen anyway.
25. Back to the startingHeroes trigger we created earlier.
26. At the end of the trigger create a new ‘loop through players loop’ like before outside (make sure it’s not inside the other loop).
27. For the actions inside the new loop we need to give each player his hero, so add a new “Create Units With Default Facing” action to the loop.
28. Now for the parameters:
1. Count: 1
2. Type: attributeToUnit (function we created earlier)
1. Attribute: Hero (your player attribute)
2. Player: player (the local var)
3. Player: player (the local var)
4. Point: <a point on your map>
5. Flags: Anything you’d like.
6. Test your map.
7. Note that the array heroPicks can now be easily used in other triggers (as it’s an global var).
Reference
Create custom game screen
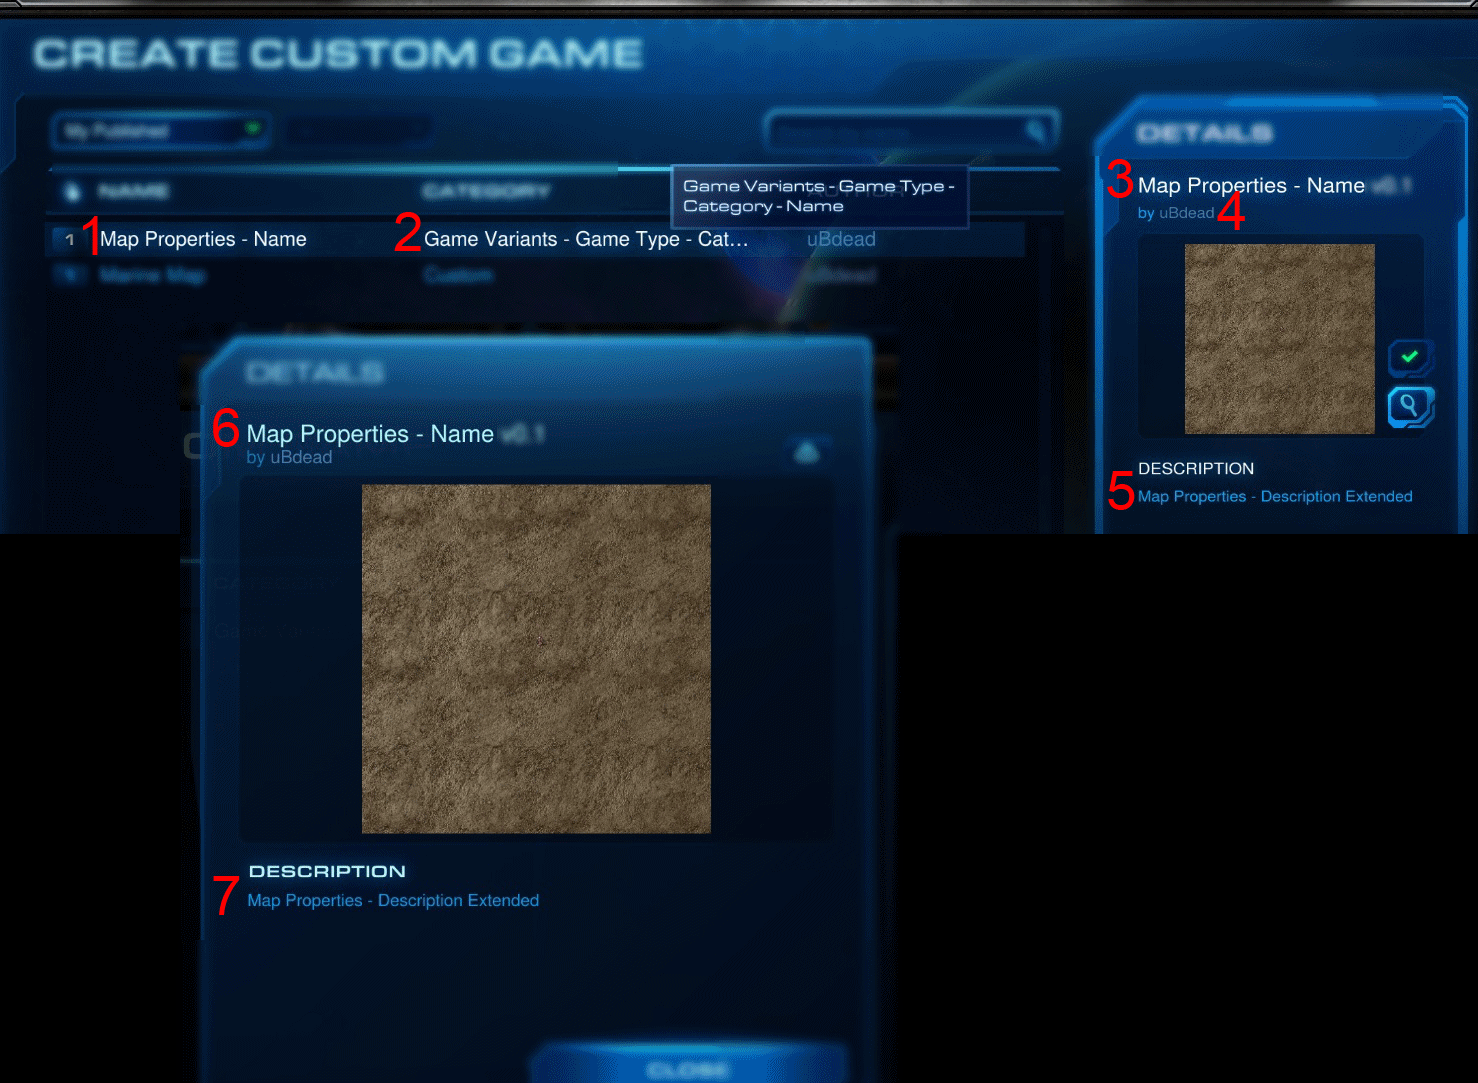
Create custom game
1. : Map properties – Name
2. : Game Variants – Game Type – Category – Name
3. : Map Properties – Name
4. : Author
5. : Map properties – Description Extended
6. : Map properties – Name
7. : Map properties – Description Extended
Game lobby
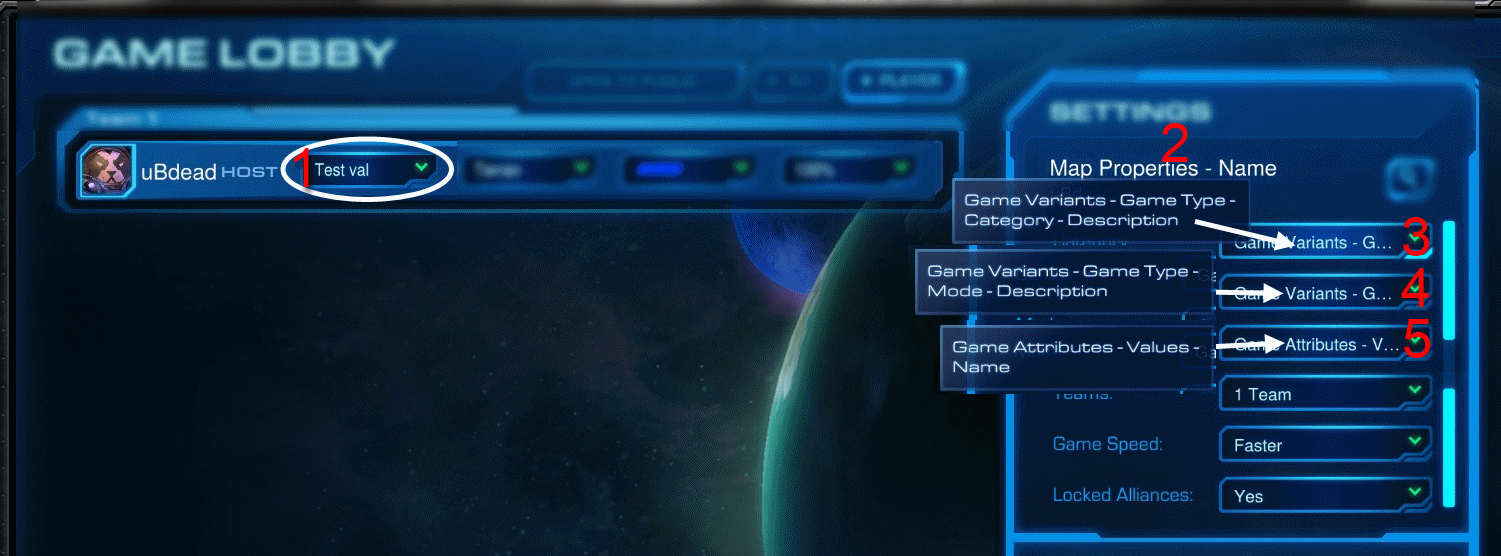
1. : Game Attributes – Values – Values – Name
2. : Map Properties - Name
3. : Game variants – Game Type – Category – Description
4. : Game variants – Game Type – Mode – Description
5. : Game Attributes – Values - Name
Loading screen
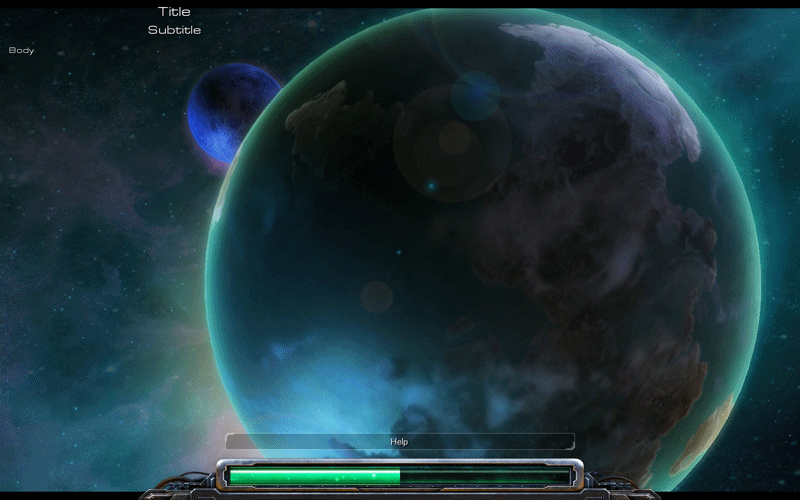
Please look at the image for reference.
This long guide will try to help you set up your lobby and serve as a reference for everything related to lobby and games modes. See chapter "Reference" for useful pictures where your text ends up in-game.Sorry for the wall of text :).
Index
I don't know how to use anchors links on this site, so this is basically a list with everything that's in this tutorial (or planned).
1. Creating a ‘one mode’ map
2. Creating a map with multiple modes
3. Player attributes, picking your hero in the lobby
4. Lobby reference
Creating a ‘one mode’ map. (Foundation for every map, this should be applied to every map).
You want this kind of map if your players have nothing to choose, however every map should apply these settings at first.
1. Set up your general map information at Map > Properties. See the reference to see where the text shows up in the game.
2. First set up your players, and who’s controlling them at Map -> Player Properties. For this example i choose to use four players (and player 0 is always neutral). Don’t set up race/color or anything else in here. ONLY THE CONTROLLER.
3. Now open up Map -> Game Variants.
4. Click the [Add] button and right click the item in the list and select ‘Default’. Select the newly appeared item in the list.
5. Go to the General tab and give your Variant a new name (this is not displayed anywhere in-game). I used “Classic”.
6. Give it a nice description (look at the reference for appearances of this field in the game).
7. I’m not sure if the Icon field is used, you might want to post in this thread if you find out what it does.
8. Next go to the Game Type tab. This is a fairly important tab, consult the reference to see where the fields are displayed in-game.
9. Please note that the Category will have to describe what kind of game your map is. Is it a FPS, RTS, Hero Defence, Tower Defence, etc.
10. The mode will be how the game is played. Take DotA for example, you can play DotA on APEM, AREM, etc.. Since you are reading this topic you will want to name your mode something like ‘Default’ or ‘Classic’.
11. Go to the Attributes tab.
1. Now I’ll walk through all the different Attributes, if I skip an Attribute just don’t touch it and leave it to default. Also lock every field. And I mean all of them.
2. Game speed: put this Faster.
3. Lobby delay: I think ten seconds is perfect.
4. Locked Alliances: This is will keep players from making teams once in-game (or un-ally players).
5. Teams: Put this to Custom Teams.
6. Color: You can lock the color’s for the players here if you want to.
7. Race: If you need certain players to be a certain race, this is the place.
8. Team [Custom teams]: Here you can set up each player’s team. So if you want 1vs3 set player 1 to Team1[1] and players 2,3 and 4 to Team2[1]. You get the picture.
9. That’s it for now.
12. Click [OK] (if you hit [Cancel] you’re so fucked).
13. Note that, as soon as you change anything to Map > Player Properties, you will get a Custom mode without any way to hide it. So retards may still set it to custom and fuck up your game. I consider this automatic Custom Mode thing a bug and I hope Blizzard will fix it in the next patch.
14. That should be it for now! Try hosting your game with the settings and you’ll be sure the teams and such are in order.
Result, note the locked color, team and such
Multiple game modes.
This chapter builds on the previous chapter, if you haven’t read it yet, please do so now.
1. Lets go to the Map > Game Variants window.
2. Duplicate your ‘Default’ mode by right clicking it in the Game Variants list and selecting ‘Duplicate’.
3. Now select the newly created Variant and go to the General tab.
4. For this example, I’m going to make a Deathmatch FFA mode, so I’m going to call mine “Deathmatch”.
5. Next up the “Game Type” tab. Don’t change anything in the Category fields. For the Mode fields I set the name to Deathmatch FFA (because my deathmatch won’t have teams, every man/alien/zerg for himself hehe).
6. Click the ‘Attributes’ tab. Ok because this is Deathmatch mode I’d like to give my players a little more options. I lock the (Game) Teams to Free For All. Clear the custom teams, and well change anything you’d like, most things should be self-explanatory.
7. Click [OK] to exit the Game Variants window. Open up Map > Game Attributes.
8. Ok, for reasons beyond my understanding, Blizzard has given us no way to get the used Game Mode in the trigger editor. No biggy, we can use a Game Attribute for this.
9. Click the [Add] button to create a new Attribute. Go to the General tab and make sure the “Game” selection is selected for Type.
10. For name fill in “Game Mode HACK”, don’t skip the HACK part or you’ll have trouble later (you can call it anything, but make sure you’ll recognize it later).
11. Go to the Values tab and create a new value for every game mode you have. For this example I have ‘Default’ and ‘Deathmatch’ as values.
12. Now go to the Usage tab. Here we are going to hide all the settings from the players because it should all be done automatically:
1. Availability: Always
2. Visibility: None
3. Access: None
4. Options: [ ] Locked when public [x] Hidden
13. Click [OK] to wrap it up and go back to Game Variants (Map > Game Variants). Select Deathmatch from the Variants list.
14. Go to the Attributes tab, you might have noticed already, there is now a new Attribute in the list: (Game) Game Mode HACK, click on it.
15. Now for (All Players) select the appropriate game mode, so Deathmatch gets Deathmatch, etc..
16. Repeat these steps to set the Game Mode HACK for Default game variant to Default.
17. Open up the trigger editor and create a new trigger called ‘gamemode’.
18. Now I’m getting pretty lazy, so I’m going to make a picture and elaborate on it:
The gamemode trigger
1. (to be continued).
Player attributes, picking your hero in the lobby
Please download at look at the attached map when reading this.
Because most of the players know DotA, I like to use it as an example. Now as you are aware, players pick a hero at the start of the game. Why not let our players pick their hero in lobby? Obviously you are not limited to picking a hero, you could give a player all sorts of choices.
1. Go to Map > Game Attributes and click the [Add] button. Select the new item in the list.
2. Go to the General tab select Player for the type.
3. Fill out the name and description field.
4. Go to the Values tab. These are the options your players can choose from, I made some silly heroes (Action Hank, Bahama Man, Monkeylord) for this example.
5. Next up let’s make sure we set some default warnings or Blizzard will yell at us for not doing so.
6. Just randomly assign them, OR, if actually want player 1 too always play Action Hank, put in the Action Hank value and check the [Locked] box.
7. Note that you can have more than one Player Attribute, but it will look shitty in the lobby as the layout gets messed up. So I’d recommend against that.
8. Ok next up using this information in the game.
9. Open up the trigger editor and create a new trigger. I called mine startingHeroes for the example.
10. First thing you don’t want to forget is that the trigger needs to be triggered when the map initializes, add an Run Trigger action to your initiation trigger that will trigger your trigger (if I say trigger one more time ill pull the trigger on myself).
11. So the next part is fairly dynamic if you didn’t follow the tutorial example, but it should be clear to you how to apply this to your own map.
12. We start the new trigger with reading the chosen heroes into an array. Create a global variable of the type Attribute Value, check the Array box. Set the Size of the array to the maximum amount of players your map will have. I called my var heroPicks.
13. We need a loop that goes through all the active players. Add a new variable called “player” to the local variables. Next add this action “Player Group - For each player player in (Active Players) do (Actions)” (a basic loop through all the players loop).
14. Add an Set Variable action inside the loop. Parameters:
1. Variable: heroPicks
1. Index player (the local var)
2. Value: Attribute Player Value (a function)
1. Attribute: Hero (or whatever you called your player attribute)
2. Player: player (the local var)
15. Great now we have an array with the hero’s the players picked.
16. So now we need to translate the picked hero’s to an actual in-game unit. Let’s create a function for this.
17. Right click the left pane and select New > Function and give it a suitable name, I called mine attributeToUnit.
18. Set the return type to “Unit Type”.
19. Create a new parameter (right click parameter and select New > Parameter or press CTRL+M). Call it attribute, type is Attribute Value.
20. Create a new Switch action and set the Value to the Parameter ‘attribute’.
21. Add the as many cases to the Switch as the amount of attribute options you have.
22. Now for each General – If (case) set the value to your attribute -> option. So using my example I set the first case to Value:
1. attribute: Hero
2. value: Action Hank.
23. Now for each Case return the correct unit type. Do this by adding a Return action to each case. For the Value enter the unit type you want the Hero you want it to correspond with. For example I returned the Marine for the hero Action Hank.
24. For the Default case return any unit type, this shouldn’t ever happen anyway.
25. Back to the startingHeroes trigger we created earlier.
26. At the end of the trigger create a new ‘loop through players loop’ like before outside (make sure it’s not inside the other loop).
27. For the actions inside the new loop we need to give each player his hero, so add a new “Create Units With Default Facing” action to the loop.
28. Now for the parameters:
1. Count: 1
2. Type: attributeToUnit (function we created earlier)
1. Attribute: Hero (your player attribute)
2. Player: player (the local var)
3. Player: player (the local var)
4. Point: <a point on your map>
5. Flags: Anything you’d like.
6. Test your map.
7. Note that the array heroPicks can now be easily used in other triggers (as it’s an global var).
Reference
Create custom game screen
Create custom game
1. : Map properties – Name
2. : Game Variants – Game Type – Category – Name
3. : Map Properties – Name
4. : Author
5. : Map properties – Description Extended
6. : Map properties – Name
7. : Map properties – Description Extended
Game lobby
1. : Game Attributes – Values – Values – Name
2. : Map Properties - Name
3. : Game variants – Game Type – Category – Description
4. : Game variants – Game Type – Mode – Description
5. : Game Attributes – Values - Name
Loading screen
Please look at the image for reference.